Adding Oracle Linux 6.4 Installation DVD as a yum repository

First, make sure the install DVD is mounted properly and take note of the mount point.  For the purpose of this post, the DVD is mounted at /mnt.

Next, create a repository file at the yum repository directory.

# vi /etc/yum.repos.d/dvd.repo

Insert the following lines inside the file, and save.

[ol6-dvd]
name=Oracle Linux 6.4 Installation DVD $basearch
baseurl=file:///mnt/Server/
enabled=1
gpgcheck=1
gpgkey=file:///mnt/RPM-GPG-KEY

[ol6-dvd-UEK]
name=Oracle Linux 6.4 Installation DVD $basearch - UEK
baseurl=file:///mnt/UEK2/
enabled=1
gpgcheck=1
gpgkey=file:///mnt/RPM-GPG-KEY

Now, the yum command will use the DVD as a repository.  Don’t forget to disable other repositories in the folder if you do not want newer packages to be installed.

Local mirror of Oracle public yum – UPDATED

Updating Oracle Linux installations via the Oracle public yum server has been cumbersome because the download speeds I have been getting are quite terrible.

Having quite a number of Oracle Linux installations compounds the issue as each server will have to endure the same slow download speeds for the same packages.  One way to stop this from happening is having a local mirror of the public yum server.  This local mirror will perform the download of the packages from the public yum server, and all other Oracle Linux installations will then grab the packages from the local mirror, saving lots of time.

I have been scouring the internet for days looking for the best way to do this, and I think the best guide so far comes from this post by Martin Nash.

I hope to setup my own mirror soon.


Update 19 August 2013

Below are the steps to setup yum mirror from a fresh CentOS 6.4 Minimal Install.

Create the directory to put the repository in.

# mkdir -p /repos/x86_64

Install the yum-utils and createrepo packages that provide the reposync and createrepo commands.

# yum install yum-utils createrepo

Set up the repository to mirror as per the instruction at Oracle.  Open the repo file and disable all repos by making sure enabled=0 for all repos.

# vi /etc/yum.repos.d/public-yum-ol6.repo

Run reposync.  This will take quite a long time, especially with the slow speeds from the Oracle public yum server.

# reposync --repoid=ol6-latest --repoid=ol6-UEK-latest -p /repos/ol6

After the reposync command finished downloading all the packages from the source repo, run createrepo to create the repository metadata.

# createrepo /repos/ol6/ol6_UEK_latest/getPackage/
# createrepo /repos/ol6/ol6_latest/getPackage/

Create a script to re-run the above as often as required (I am going to run it once a day).

#!/bin/bash
LOG_FILE=/repos/logs/orayum-update_$(date +%Y.%m.%d).log
/usr/bin/reposync --repoid=ol6_latest --repoid=ol6_UEK_latest -p /repos/ol6 >> $LOG_FILE 2>&1
/usr/bin/createrepo /repos/ol6/ol6_UEK_latest/getPackage/ >> $LOG_FILE 2>&1
/usr/bin/createrepo /repos/ol6/ol6_latest/getPackage/ >> $LOG_FILE 2>&1

Create the directories to store the script and logs, and move the script inside the directory

# mkdir -p /repos/logs
# mkdir -p /repos/scripts
# mv orayum-update.sh /repos/scripts

Make the script executable

# chmod +x /repos/scripts/orayum-update.sh

Add the script to crontab, and run once every day.

# crontab -e
0 0 * * * /repos/scripts/orayum-update.sh

# crontab -l
0 0 * * * /repos/scripts/orayum-update.sh

Install and configure Apache webserver.

# yum install httpd
# chkconfig httpd on
# service httpd start

Now configure Apache to serve the repository.

# mkdir -p /var/www/html/repo/OracleLinux/OL6/latest
# mkdir -p /var/www/html/repo/OracleLinux/OL6/UEK/latest
# ln -s /repos/ol6/ol6_latest/getPackage/ /var/www/html/repo/OracleLinux/OL6/latest/x86_64
# ln -s /repos/ol6/ol6_UEK_latest/getPackage/ /var/www/html/repo/OracleLinux/OL6/UEK/latest/x86_64

Open up the firewall for Apache.

# iptables -I INPUT 5 -p tcp --dport 80 -m state --state NEW -j ACCEPT
# service iptables save

Now we need to fix the SELinux contexts for the repository files, so that the repository, which is soft-linked from the /var/www/html sub-folders, can be served by Apache.

# yum install policycoreutils-python
# semanage fcontext -a -t httpd_sys_content_t "/repos/ol6/ol6_latest/getPackage(/.*)?"
# semanage fcontext -a -t httpd_sys_content_t "/repos/ol6/ol6_UEK_latest/getPackage(/.*)?"
# restorecon -R -v /repos/ol6/

Get the repository GPG key as well, and put it into the root Apache directory.

# cd /var/www/html
# wget http://public-yum.oracle.com/RPM-GPG-KEY-oracle-ol6

Now the local yum mirror is fully setup!  Local Oracle Linux 6 installations can now use this repository by creating a repo file in /etc/yum.repos.d/ folder.

# cd /etc/yum.repos.d
# vi public-yum-ol6-local.repo

The repo file looks something like this:

[ol6_latest_local]
name=Oracle Linux $releasever Latest ($basearch)
baseurl=http://<hostname>/repo/OracleLinux/OL6/latest/$basearch/
gpgkey=http://<hostname>/RPM-GPG-KEY-oracle-ol6
gpgcheck=1
enabled=1

[ol6_UEK_latest_local]
name=Latest Unbreakable Enterprise Kernel for Oracle Linux $releasever ($basearch)
baseurl=http://<hostname>/repo/OracleLinux/OL6/UEK/latest/$basearch/
gpgkey=http://<hostname>/RPM-GPG-KEY-oracle-ol6
gpgcheck=1
enabled=1

Done!
Upgrade to Oracle 12c Exam

Just registered for the 1Z1-060 exam.  Time to read up!

New Features of Oracle Database 12c
Enterprise Manager and Other Tools
  • Use EM Express
  • Use OUI, DBCA for installation and configuration
Basics of Multitenant Container Database (CDB)
  • Identify the benefits of the multitenant container database
  • Explain root and multitenant architecture
Configuring and Creating CDBs and PDBs
  • Create and configure a CDB
  • Create and configure a PDB
  • Migrate a non-CDB to a PDB database
Managing CDBs and PDBs
  • Establish connection to a CDB/PDB
  • Start up and shut down a CDB/PDB
  • Change instance parameters for a CDB/PDB
Managing Tablespaces, Common and Local Users, Privileges and Roles
  • Manage tablespaces in a CDB/PDB
  • Manage users and privileges for CDB/PDB
Backup, Recovery and Flashback for a CDB/PDB
  • Perform backup of CDB and PDB
  • Perform recovery of CDB and PDB
  • Perform Flashback for a CDB
Information Lifecycle Management and Storage Enhancements
  • Use ILM features
  • Perform tracking and automated data placement
  • Use Online Move Datafile
In-Database Archiving and Valid-Time Temporal
  • Differentiate between IL and Valid-Time Temporal
  • Set and use Valid Time Temporal
  • Use In-Database archiving
Auditing
  • Enable and configure Unified Audit Data Trail
  • Create and enable audit policies
Privileges
  • Use administrative privileges
  • Create, enable and use privilege analysis
Oracle Data Redaction
  • Use and manage Oracle Data Redaction policies

RMAN and Flashback Data Archive

  • Use RMAN enhancements
  • Implement the new features in Flashback Data Archive
Real-Time Database Operation Monitoring
  • Implement real-time database operation monitoring
SQL Tuning
  • Use Adaptive Execution Plans
  • Use enhanced features of statistics gathering
  • Use Automatic SQL Plan Management
Emergency Monitoring, Real-Time ADDM, Compare Period ADDM, and Active Session History (ASH) Analytics
  • Perform emergency monitoring and real-time ADDM
  • Generate ADDM Compare Period
  • Diagnose performance issues using ASH enhancements
Resource Manager and Other Performance Enhancements
  • Use Resource Manager for a CDB and PDB
  • Explain Multi-process Multi-threaded Oracle architecture
  • Use Flash Cache
Index and Table Enhancements
  • Use Index enhancements
  • Use Table enhancements
  • Use Online operation enhancements
ADR and Network Enhancements
  • Explain ADR enhancements
Oracle Data Pump, SQL*Loader, External Tables and Online Operations Enhancements
  • Use Oracle Data Pump enhancements
  • Use SQL*Loader and External table enhancements
Partitioning Enhancements
  • Explain Partitioning enhancements
  • Explain Index enhancements for partitioned tables
SQL Enhancements
  • Use Oracle Database Migration Assistant for Unicode
  • Use Row limiting clause, and secure file LOBs enhancements
  • Configure extended datatypes
Key DBA Skills
Core Administration
  • Explain the fundamentals of DB architecture
  • Install and configure a database
  • Configure server and client network for a database
  • Monitor database alerts
  • Perform daily administration tasks
  • Apply and review patches
  • Back up and recover the database
  • Troubleshoot network and database issues
  • Detect and repair data failures with Data Recovery Advisor
  • Implement Flashback Technology
  • Load and Unload Data
  • Miscellaneous
    • Relocate SYSAUX occupants
    • Create a default permanent tablespace
    • Use the Redo Logfile Size Advisor
    • Use Secure File LOBs
    • Use Direct NFS
Performance Management
  • Design the database layout for optimal performance
  • Monitor performace
  • Manage memory
  • Analyze and identify performance issues
  • Perform real application testing
  • Use Resource Manager to manage resources
  • Implement Application Tuning
Storage
  • Manage database structures
  • Administer ASM
  • Manage ASM disks and diskgroups
  • Manage ASM instance
  • Manage VLDB
  • Implement Space Management
Security
  • Develop and implement a security policy
  • Configure and manage auditing
  • Create the password file
  • Implement column and tablespace encryption

High RAM Prices

I am thinking of building a new Haswell machine as a second ESXi lab to test the new Oracle Database 12c.  My current lab, a Nehalem rig that was built 4 years ago, will not be up to scratch this test because it has only 24GB of RAM, and the new Grid Infrastructure will need a minimum of 4GB RAM per cluster node.

Haswell will allow a maximum of 32GB RAM..

Just as I was writing the above, I thought to myself, why not ask Uncle Google if my Nehalem board can take 8GB sticks?  It turns out that some people already did fit their EX58 motherboards with 8GB sticks, and managed to get 48GB of RAM recognized! Maybe I don’t need Haswell after all.

But to buy RAM now is a bit hard on the wallet as RAM prices are ridiculous.  Last year, a 4GB DDR3 stick can be bought at RM60 but now it is RM100 per stick!

Should I buy now, or should I wait?

Testing Windows 8.1 using VirtualBox

Microsoft released a preview of the upcoming service pack to Windows 8, named Windows 8.1 and also codenamed Windows Blue.  As a user of Windows 8, I wanted to see what are the changes that could be expected when the update becomes live and therefore decided to fire up and test the new OS inside VirtualBox.

I downloaded the 64-bit ISO from this webpage.  The page also gave away a preview product key to be used.

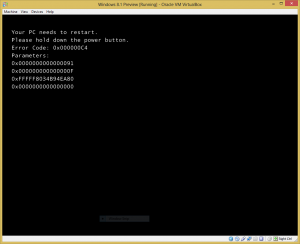
Then, I created a new virtual machine inside VirtualBox using the default WIndows 8 configuration.  I then turned on both 3D and 2D acceleration support, and mounted the Windows 8.1 ISO to the virtual machine.  However, the virtual machine failed to boot with 0x000000C4 error.

0x000000C4 Error

Luckily, someone else had already come across this problem, and created a VirtualBox support ticket.  The solution can be found here, which requires an extra setting to be configured on the virtual machine.

"C:\Program Files\Oracle\VirtualBox\VBoxManage.exe" setextradata [VM_name] VBoxInternal/CPUM/CMPXCHG16B 1

VM_name should be set to the name you have given to the virtual machine.  This can be double-checked using the following command:

"C:\Program Files\Oracle\VirtualBox\VBoxManage.exe" list vms

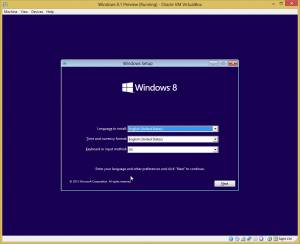
Now the ISO booted fine, and the installation can begin.

Windows install start screen


Installing vSphere CLI 5.1 U1 on CentOS 6.4

My attempt to monitor ESXi 5.1 hosts using Zenoss failed spectacularly at the install vCLI phase.  I have since been able to complete vCLI installation, and managed to run the resxtop command successfully.  However, the new version of resxtop (5.1 U1) returns too much output, and will not work with Zenoss’s esxtop ZenPack.  I guess I will have to wait until the Zenoss community comes up with a ZenPack for Zenoss 4.2 to work with the newer ESXi versions.

This post is to document the installation of vSphere CLI 5.1 U1 on CentOS 6.4, which is NOT supported by VMware (they only support vCLI installations on CentOS 5.5).

I will start with a minimal install of CentOS 6.4.  Then SELinux is disabled by editing /etc/sysconfig/selinux and rebooting the system.  Then, a yum upgrade is performed to update the kernel and all packages to the latest versions.  And a reboot, of course.

The vSphere installation will use these packages:

  • perl-CPAN = the installer will use CPAN to install PERL modules.
  • make & gcc = CPAN will use make and gcc to compile codes.
  • openssl-devel = the installer will run a check for this package before it can proceed.
  • perl-YAML = some of the PERL modules required by the installer will need this.
  • libxml2-devel = XML PERL modules will require this library.
  • libuuid-devel = the UUID PERL module will require this.

So let’s install them.

# yum install perl-CPAN make gcc openssl-devel perl-YAML libxml2-devel libuuid-devel

The installation script will also use some environment variables to be fed as arguments.  These environment variables will be needed to be set before installation.

# export http_proxy=
# export ftp_proxy=

Next, download the vSphere CLI installation package, and extract the archive.

# tar xzvf VMware-vSphere-CLI-5.1.0-1060453.x86_64.gz

Travel into the extracted directory, and run the installation program.

# cd vmware-vsphere-cli-distrib
# ./vmware-install.pl
Creating a new vSphere CLI installer database using the tar4 format.

Installing vSphere CLI 5.1.0 build-1060453 for Linux.

You must read and accept the vSphere CLI End User License Agreement to
continue.
Press enter to display it.

-- LICENSE AGREEMENT --

Do you accept? (yes/no) yes

Thank you.

Please wait while configuring CPAN ...

Please wait while configuring perl modules using CPAN ...

CPAN is downloading and installing pre-requisite Perl module "Archive::Zip" .

CPAN is downloading and installing pre-requisite Perl module "Compress::Zlib" .

CPAN is downloading and installing pre-requisite Perl module
"Compress::Raw::Zlib" .

CPAN is downloading and installing pre-requisite Perl module "Crypt::SSLeay" .

CPAN is downloading and installing pre-requisite Perl module
"IO::Compress::Base" .

CPAN is downloading and installing pre-requisite Perl module
"IO::Compress::Zlib::Constants" .

CPAN is downloading and installing pre-requisite Perl module
"Class::MethodMaker" .

CPAN is downloading and installing pre-requisite Perl module "HTML::Parser" .

CPAN is downloading and installing pre-requisite Perl module "UUID" .

CPAN is downloading and installing pre-requisite Perl module "Data::Dump" .

CPAN is downloading and installing pre-requisite Perl module "SOAP::Lite" .

CPAN is downloading and installing pre-requisite Perl module "URI" .

CPAN is downloading and installing pre-requisite Perl module "XML::SAX" .

CPAN is downloading and installing pre-requisite Perl module
"XML::NamespaceSupport" .

CPAN is downloading and installing pre-requisite Perl module
"XML::LibXML::Common" .

CPAN is downloading and installing pre-requisite Perl module "XML::LibXML" .

CPAN is downloading and installing pre-requisite Perl module "LWP" .

CPAN is downloading and installing pre-requisite Perl module
"LWP::Protocol::https" .

In which directory do you want to install the executable files?
[/usr/bin]

Please wait while copying vSphere CLI files...

The installation of vSphere CLI 5.1.0 build-1060453 for Linux completed
successfully. You can decide to remove this software from your system at any
time by invoking the following command:
"/usr/bin/vmware-uninstall-vSphere-CLI.pl".

This installer has successfully installed both vSphere CLI and the vSphere SDK
for Perl.

The following Perl modules were found on the system but may be too old to work
with vSphere CLI:

version 0.78 or newer

Enjoy,

--the VMware team

Checking /usr/bin/ shows a bunch of commands that has been installed like resxtop, vicfg-*, esxcfg-* and others.

Monitoring ESXi 5.1 hosts using Zenoss (Part 1 – FAILED)

My Zenoss install has been working quite well, especially for monitoring Linux servers.  The /Server/Linux device class works great with net-snmp on Linux hosts.  Windows monitoring is also working very nicely with SNMP Informant as the agent.

The next challenge is to make Zenoss work with ESXi 5.1 hosts.  ESXi 5.1 has an SNMP agent installed, but no useful information can be grabbed using this agent.  We have to use the esxtop Zenpack to effectively monitor ESXi hosts.  This Zenpack will use the resxtop command instead of SNMP to fetch information.

The resxtop command has to be installed into the Zenoss server via installing the vSphere CLI.  The installation file can be downloaded from the VMware website.  As of the time of writing, the latest vCLI version is 5.1 U1.

I am using instructions from the Zenoss Core Extended Monitoring Guide.

First, install OpenSSL development package.

# yum install openssl-devel

Then, download the vCLI and unpack.

# tar xzvf VMware-vSphere-CLI-5.1.0-1060453.x86_64.tar.gz

Now, run the installer.

# cd vmware-vsphere-cli-distrib
# ./vmware-install.pl

....
CPAN module not installed on the system.
CPAN module is required to install missing pre-requisite Perl modules. Please
install CPAN.

Apparently, something called CPAN needs to be installed.  A yum search shows a package called perl-CPAN, so let’s install that, and restart the vCLI installation.

# yum install perl-CPAN

# ./vmware-install.pl
Please wait while configuring CPAN ...

Please wait while configuring perl modules using CPAN ...

CPAN is downloading and installing pre-requisite Perl module "Archive::Zip" .

CPAN is downloading and installing pre-requisite Perl module "Compress::Zlib" .

CPAN is downloading and installing pre-requisite Perl module
"Compress::Raw::Zlib" .

CPAN is downloading and installing pre-requisite Perl module "Crypt::SSLeay" .

CPAN is downloading and installing pre-requisite Perl module
"IO::Compress::Base" .

CPAN is downloading and installing pre-requisite Perl module
"IO::Compress::Zlib::Constants" .

CPAN is downloading and installing pre-requisite Perl module
"Class::MethodMaker" .

CPAN is downloading and installing pre-requisite Perl module "HTML::Parser" .

CPAN is downloading and installing pre-requisite Perl module "UUID" .

CPAN is downloading and installing pre-requisite Perl module "Data::Dump" .

CPAN is downloading and installing pre-requisite Perl module "SOAP::Lite" .

CPAN is downloading and installing pre-requisite Perl module "URI" .

CPAN is downloading and installing pre-requisite Perl module "XML::SAX" .

CPAN is downloading and installing pre-requisite Perl module
"XML::NamespaceSupport" .

CPAN is downloading and installing pre-requisite Perl module
"XML::LibXML::Common" .

CPAN is downloading and installing pre-requisite Perl module "XML::LibXML" .

CPAN is downloading and installing pre-requisite Perl module "LWP" .

CPAN is downloading and installing pre-requisite Perl module
"LWP::Protocol::https" .

CPAN not able to install following Perl modules on the system. These must be
installed manually for use by vSphere CLI:

Archive::Zip 1.28 or newer
Compress::Zlib 2.037 or newer
Compress::Raw::Zlib 2.037 or newer
Crypt::SSLeay 0.55 or newer
IO::Compress::Base 2.037 or newer
IO::Compress::Zlib::Constants 2.037 or newer
Class::MethodMaker 2.10 or newer
HTML::Parser 3.60 or newer
UUID 0.03 or newer
Data::Dump 1.15 or newer
SOAP::Lite 0.710.08 or newer
URI 1.37 or newer
XML::SAX 0.16 or newer
XML::NamespaceSupport 1.09 or newer
XML::LibXML::Common 0.13 or newer
XML::LibXML 1.63 or newer
LWP 5.805 or newer
LWP::Protocol::https 5.805 or newer

Oh boy.  I’ll figure this one out later.