Tag Archives: oracle xe

Upgrade Oracle APEX from 4.2.4 to 4.2.5

Introduction

Oracle recently released version 4.2.5 of its Application Express (APEX) software.  This post is to document how to upgrade Oracle APEX from 4.2.4 to 4.2.5.

The Oracle APEX installation to be upgraded has the following specification:

  1. The operating system of the server is CentOS 6.5.
  2. The Oracle Database version is Oracle XE 11gR2.
  3. Oracle APEX is served using the APEX Listener, via GlassFish 4.

Download and read the Patch Set Notes

First things first, read up on the patch set notes here.

Download and unzip the Patch Set

Next, the patch set is downloaded via Oracle Support.

The downloaded patch set is then extracted.

[oracle@server ~]$ unzip p17966818_425_Generic.zip

Backup database

The database is backed up as a precaution if the patch is unsuccessful.

I prefer a cold and consistent backup to ease the recovery process.

[oracle@server ~]$ rman target / nocatalog

Recovery Manager: Release 11.2.0.2.0 - Production on Fri Apr 25 09:38:09 2014

Copyright (c) 1982, 2009, Oracle and/or its affiliates.  All rights reserved.

connected to target database: XE (DBID=2709648321)
using target database control file instead of recovery catalog

RMAN> shutdown immediate

database closed
database dismounted
Oracle instance shut down

RMAN> startup mount

connected to target database (not started)
Oracle instance started
database mounted

RMAN> backup database plus archivelog;

RMAN> alter database open;

database opened
RMAN> exit

Recovery Manager complete.

Prevent access to the APEX instance

No users should be using the APEX installation while it is being upgraded.  Access to the instance should be limited.  In this particular case, since APEX is served by the APEX Listener which is hosted by a GlassFish instance, user access is prevented by shutting down the GlassFish instance.

[oracle@server ~]$ sudo service glassfish4 stop
Shutting down glassfish4: Waiting for the domain to stop ...
Command stop-domain executed successfully.
                                                           [  OK  ]

The above command is used to control the GlassFish installation only if the corresponding service init script has already been correctly created.  An example on how this is done can be found here.

Apply the patch set

Now, set the current directory to the patch directory, and apply the patch.

[oracle@server ~]$ cd patch
[oracle@server patch]$ sqlplus / as sysdba

SQL*Plus: Release 11.2.0.2.0 Production on Fri Apr 25 09:38:45 2014

Copyright (c) 1982, 2011, Oracle.  All rights reserved.

Connected to:
Oracle Database 11g Express Edition Release 11.2.0.2.0 - 64bit Production

SQL> @apxpatch.sql

The patch will now be applied, and the process will take a few minutes.

Copy patch directory contents into APEX directory

After the patch process is completed, it is time to copy the contents of the patch directory into the original APEX installation directory.

[oracle@server patch]$ cp -R * /path/to/apex/

This will include the images directory as well, and if the path to the APEX directory is the same one used to originally create the images WAR file, the WAR file need not be recreated.

Restart GlassFish

The final step is to restart the GlassFish instance.

[oracle@server ~]$ sudo service glassfish4 start
Starting glassfish4: Waiting for domain1 to start .....................................................
Successfully started the domain : domain1
domain  Location: /home/gfish/glassfish4/glassfish/domains/domain1
Log File: /home/gfish/glassfish4/glassfish/domains/domain1/logs/server.log
Admin Port: 4848
Command start-domain executed successfully.
                                                           [  OK  ]

Now the APEX installation is successfully updated to version 4.2.5, and is ready to be accessed.
Upgrade Oracle APEX from 4.2.3 to 4.2.4

Introduction

Oracle recently released version 4.2.4 of its Application Express (APEX) software.  This post is to document how to upgrade Oracle APEX from 4.2.3 to 4.2.4.

The Oracle APEX installation to be upgraded has the following specification:

  1. The operating system of the server is CentOS 6.5.
  2. The Oracle Database version is Oracle XE 11gR2.
  3. Oracle APEX is served using the APEX Listener, via GlassFish 4.

Download and read the Patch Set Notes

First things first, read up on the patch set notes here.

Download and unzip the Patch Set

Next, the patch set is downloaded via Oracle Support.

The downloaded patch set is then extracted.

[oracle@server ~]$ unzip p17607802_424_Generic.zip

Backup database

The database is backed up as a precaution if the patch is unsuccessful.

I prefer a cold and consistent backup to ease the recovery process.

[oracle@server ~]$ rman target / nocatalog

Recovery Manager: Release 11.2.0.2.0 - Production on Tue Jan 7 12:33:41 2014

Copyright (c) 1982, 2009, Oracle and/or its affiliates.  All rights reserved.

connected to target database: XE (DBID=2709648321)
using target database control file instead of recovery catalog

RMAN> shutdown immediate

database closed
database dismounted
Oracle instance shut down

RMAN> startup mount

connected to target database (not started)
Oracle instance started
database mounted

RMAN> backup database plus archivelog;

RMAN> alter database open;

database opened
RMAN> exit

Recovery Manager complete.

Prevent access to the APEX instance

No users should be using the APEX installation while it is being upgraded.  Access to the instance should be limited.  In this particular case, since APEX is served by the APEX Listener which is hosted by a GlassFish instance, user access is prevented by shutting down the GlassFish instance.

[oracle@server ~]$ sudo service glassfish4 stop
Shutting down glassfish4: Waiting for the domain to stop ...
Command stop-domain executed successfully.
                                                           [  OK  ]

The above command is used to control the GlassFish installation only if the corresponding service init script has already been correctly created.  An example on how this is done can be found here.

Apply the patch set

Now, set the current directory to the patch directory, and apply the patch.

[oracle@server ~]$ cd patch
[oracle@server patch]$ sqlplus / as sysdba

SQL*Plus: Release 11.2.0.2.0 Production on Tue Jan 7 16:07:39 2014

Copyright (c) 1982, 2011, Oracle.  All rights reserved.

Connected to:
Oracle Database 11g Express Edition Release 11.2.0.2.0 - 64bit Production

SQL> @apxpatch.sql

The patch will now be applied, and the process will take a few minutes.

Copy patch directory contents into APEX directory

After the patch process is completed, it is time to copy the contents of the patch directory into the original APEX installation directory.

[oracle@server patch]$ cp -R * /path/to/apex/

This will include the images directory as well, and if the path to the APEX directory is the same one used to originally create the images WAR file, the WAR file need not be recreated.

Restart GlassFish

The final step is to restart the GlassFish instance.

[oracle@server ~]$ sudo service glassfish4 start
Starting glassfish4: Waiting for domain1 to start .....................................................
Successfully started the domain : domain1
domain  Location: /home/gfish/glassfish4/glassfish/domains/domain1
Log File: /home/gfish/glassfish4/glassfish/domains/domain1/logs/server.log
Admin Port: 4848
Command start-domain executed successfully.
                                                           [  OK  ]

Now the APEX installation is successfully updated to version 4.2.4, and is ready to be accessed.

OpenSSL workaround for Oracle XE wallet

In Oracle, the UTL_HTTP package is used to fetch pages from the internet directly by the database.  For example, using the UTL_HTTP.REQUEST function, the first 2000 bytes of a web page can be displayed:

SQL> SET PAGESIZE 100
SQL> select UTL_HTTP.REQUEST('http://www.google.com') from dual;

UTL_HTTP.REQUEST('HTTP://WWW.GOOGLE.COM')
--------------------------------------------------------------------------------
<!doctype html><html itemscope="" itemtype="http://schema.org/WebPage"><head><me
ta content="Search the world's information, including webpages, images, videos a
nd more. Google has many special features to help you find exactly what you're l
ooking for." name="description"><meta content="noodp" name="robots"><meta itempr
op="image" content="/images/google_favicon_128.png"><title>Google</title><script
>(function(){
window.google={kEI:"X057UtKqGYvprQeorYDgAQ",getEI:function(a){for(var b;a&&(!a.g
etAttribute||!(b=a.getAttribute("eid")));)a=a.parentNode;return b||google.kEI},h
ttps:function(){return"https:"==window.location.protocol},kEXPI:"17259,146147,40
00116,4006293,4006727,4007231,4007661,4007714,4007830,4008067,4008133,4008142,40
08365,4008725,4009033,4009378,4009565,4009663,4009671,4010061,4010806,4010899,40
10938,4011063,4011107,4011125,4011228,4011256,4011258,4011334,4011376,4011522,40
11524,4011525,4011529,4011559,4011619,4011683,4011709,4011863,4011872,4011911,40
11971,4012001,4012003,4012011,4012090,4012095,4012141,4012145,4012147,4012302,40
12306,4012316,4012318,4012342,4012361,4012365,4012422,4012544,4012585,4012593,40
12632",kCSI:{e:"17259,146147,4000116,4006293,4006727,4007231,4007661,4007714,400
7830,4008067,4008133,4008142,4008365,4008725,4009033,4009378,4009565,4009663,400
9671,4010061,4010806,4010899,4010938,4011063,4011107,4011125,4011228,4011256,401
1258,4011334,4011376,4011522,4011524,4011525,4011529,4011559,4011619,4011683,401
1709,4011863,4011872,4011911,4011971,4012001,4012003,4012011,4012090,4012095,401
2141,4012145,4012147,4012302,4012306,4012316,4012318,4012342,4012361,4012365,401
2422,4012544,4012585,4012593,4012632",ei:"X057UtKqGYvprQeorYDgAQ"},authuser:0,ml
:function(){},kHL:"en",time:function(){return(new Date).getTime()},log:function(
a,b,c,l,k){var d=new Image,f=google.lc,e=google.li,g="",h="gen_204";k&&(h=
k);d.onerror=d.onload=d.onabort=function(){delete f[e]};f[e]=d;c||-1!=b.search("
&ei=")||(g="&ei="+google.getEI(l));c=c||"/"+h+"?atyp=i&ct="+a+"&cad=

SQL>

However, for pages served with SSL i.e. the https protocol, UTL_HTTP will need access to an Oracle Wallet that stores the trusted certificates for the encryption. Attempting to connect without a wallet will result in a certificate validation error:

SQL> select UTL_HTTP.REQUEST('https://support.oracle.com') from dual;
select UTL_HTTP.REQUEST('https://support.oracle.com') from dual
       *
ERROR at line 1:
ORA-29273: HTTP request failed
ORA-06512: at "SYS.UTL_HTTP", line 1722
ORA-29024: Certificate validation failure
ORA-06512: at line 1

SQL>

An Oracle Wallet can be created by the Oracle Wallet Manager program.  Unfortunately, the Oracle Wallet Manager program is not distributed with Oracle XE.  I think this is because historically encryption has been part of Oracle Advanced Security, a paid optional Oracle feature.  The good news is SSL/TLS encryption is no longer part of Oracle Advanced Security, as per the Oracle 11gR2 Licensing Guide:

Network encryption (native network encryption and SSL/TLS) and strong authentication services (Kerberos, PKI, and RADIUS) are no longer part of Oracle Advanced Security and are available in all licensed editions of all supported releases of the Oracle database.

So far we have established that using TLS/SSL with Oracle XE is not violating any Oracle licensing issue.  We just have to find a way to create the wallet to be used by Oracle XE.  Of course you can run Oracle Wallet Manager from a non-XE Oracle installation somewhere, and transfer the wallet to your Oracle XE installation.  But what if you do not have access to any properly licensed installation of Oracle?

From the Oracle 11gR2 Advanced Security Guide:

Oracle Wallet Manager stores X.509 certificates and private keys in PKCS #12 format, and generates certificate requests according to the PKCS #10 specification. These capabilities make the Oracle wallet structure interoperable with supported third-party PKI applications and provide wallet portability across operating systems.

Therefore, we can use OpenSSL to create a PKCS #12 archive and it should work with Oracle XE.

In Oracle terminology, a wallet is a directory containing a file named ewallet.p12. Therefore, the PKCS #12 file must be named as such.

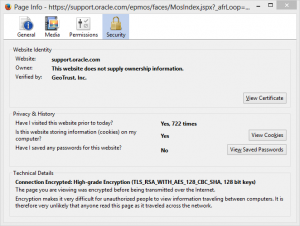
In this example I will use the Oracle Support web page as the target page.  First, grab the certificate and all the certificates in its chain by using a browser.  In Firefox, this is done by clicking the padlock icon in the address bar, then clicking on ‘More Information…’.

Firefox Page Info - Security tabThen click on ‘View Certificate’

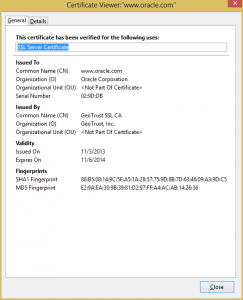
Firefox Certificate ViewerGo to the ‘Details’ tab

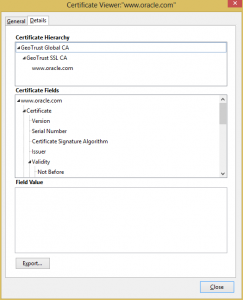
Firefox Certificate Viewer - Details tabSelect the certificate at the bottom of the chain (www.oracle.com) and click ‘Export…’.

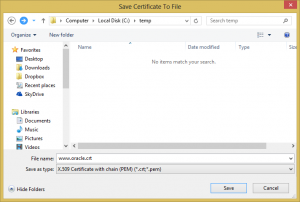
Save Certificate to FileChange the ‘Save as type’ to ‘X.509 Certificate with chain (PEM)’ and save the certificates to a file.

Transfer this file (mine is named www.oracle.crt) to your Oracle XE server where you want your wallet to be (I chose /u01/app/oracle/wallet).

Now use OpenSSL’s pkcs12 command to create the wallet file using the certificate file as input.  Use the -export flag to create a PKCS #12 file instead of reading one, and use the -nokeys flag to indicate that a private key does not exist inside the input file.  Enter a suitable password when prompted.  This password will have to be provided when using UTL_HTTP later.

[oracle@oraclexe ~]$ cd /u01/app/oracle/wallet
[oracle@oraclexe wallet]$ openssl pkcs12 -export -in www.oracle.crt -out ewallet.p12 -nokeys
Enter Export Password:
Verifying - Enter Export Password:
[oracle@oraclexe wallet]$

Now we can make SSL calls to the Oracle Support website from the database by providing the wallet and password to UTL_HTTP:

SQL> set pagesize 100
SQL> select UTL_HTTP.REQUEST('https://support.oracle.com',null,'file:/u01/app/oracle/wallet','password') Output from dual;

OUTPUT
--------------------------------------------------------------------------------
<HTML>
<HEAD>
<title>Oracle Configuration Support Manager</title>
<meta http-equiv="REFRESH" content="0;url=/epmos/faces/MosIndex.jspx"></HEAD>
<BODY>
</BODY>
</HTML>


Move Oracle APEX on Oracle XE 11gR2 from EPG to APEX Listener

I have been playing with Oracle Application Express (APEX) to make a few applications, but I have never been bothered to switch from the default Embedded PL/SQL Gateway (EPG).  However, after becoming a little bit familiar with APEX and its different configurations, I became interested to explore other ways of deploying APEX.

The purpose of this post is to document the switch-over of my APEX deployment from EPG to APEX Listener.

The OS of the server is CentOS 6.4.  I installed Oracle Express Edition (XE) 11gR2, with which APEX 4.0 is included.  I then upgraded APEX to 4.2.3, and installed GlassFish 4 Open Source Edition on the server.

Next, configure the APEX_PUBLIC_USER user.

 SQL> alter user apex_public_user identified by password account unlock;

After that it is time to disable EPG.

SQL> exec dbms_xdb.sethttpport(0);

Next, go into the APEX unzipped directory and run the configure restful services script.

$ cd apex_install_directory
$ sqlplus / as sysdba
SQL> @apex_rest_config
Enter a password for the APEX_LISTENER user              []
Enter a password for the APEX_REST_PUBLIC_USER user              []

PL/SQL procedure successfully completed.

PL/SQL procedure successfully completed.

...create APEX_LISTENER user

PL/SQL procedure successfully completed.

User created.

...create APEX_REST_PUBLIC_USER user

User created.

Grant succeeded.

Grant succeeded.

Grant succeeded.

Grant succeeded.

Grant succeeded.

Grant succeeded.

Grant succeeded.

Grant succeeded.

Grant succeeded.

Grant succeeded.

Grant succeeded.

Grant succeeded.

Grant succeeded.

Grant succeeded.

Grant succeeded.

Grant succeeded.

Grant succeeded.

Grant succeeded.

Grant succeeded.

Grant succeeded.

Grant succeeded.

Grant succeeded.

Grant succeeded.

Grant succeeded.

Session altered.

Synonym created.

Synonym created.

Synonym created.

Synonym created.

Synonym created.

Synonym created.

Synonym created.

Synonym created.

Synonym created.

Synonym created.

Synonym created.

Synonym created.

Synonym created.

Synonym created.

Synonym created.

Synonym created.

Synonym created.

Synonym created.

Synonym created.

Synonym created.

Synonym created.

Synonym created.

Session altered.

PL/SQL procedure successfully completed.

SQL>

Then, grant connect privileges to the APEX_040200 user.

 DECLARE
  ACL_PATH  VARCHAR2(4000);
BEGIN
  -- Look for the ACL currently assigned to '*' and give APEX_040200
  -- the "connect" privilege if APEX_040200 does not have the privilege yet.

  SELECT ACL INTO ACL_PATH FROM DBA_NETWORK_ACLS
   WHERE HOST = '*' AND LOWER_PORT IS NULL AND UPPER_PORT IS NULL;

  IF DBMS_NETWORK_ACL_ADMIN.CHECK_PRIVILEGE(ACL_PATH, 'APEX_040200',
     'connect') IS NULL THEN
      DBMS_NETWORK_ACL_ADMIN.ADD_PRIVILEGE(ACL_PATH,
     'APEX_040200', TRUE, 'connect');
  END IF;

EXCEPTION
  -- When no ACL has been assigned to '*'.
  WHEN NO_DATA_FOUND THEN
  DBMS_NETWORK_ACL_ADMIN.CREATE_ACL('power_users.xml',
    'ACL that lets power users to connect to everywhere',
    'APEX_040200', TRUE, 'connect');
  DBMS_NETWORK_ACL_ADMIN.ASSIGN_ACL('power_users.xml','*');
END;
/
COMMIT;

Download and unzip APEX Listener.

Configure APEX Listener.

# java -jar apex.war
This Listener instance has not yet been configured.
Please complete the following prompts

Enter the location to store configuration data:/root/apex_listener/
Oct 15, 2013 1:31:28 AM oracle.dbtools.common.config.cmds.ConfigDir execute
INFO: Set config.dir to /root/apex_listener/ in: /root/apex_listener/apex.war
Oct 15, 2013 1:31:29 AM oracle.dbtools.common.config.file.ConfigurationFolder logConfigFolder
INFO: Using configuration folder: /root/apex_listener/apex
Enter the name of the database server [localhost]:
Enter the database listen port [1521]:
Enter 1 to specify the database service name, or 2 to specify the database SID [1]:2
Enter the database SID [xe]:
Enter the database user name [APEX_PUBLIC_USER]:
Enter the database password for APEX_PUBLIC_USER:
Confirm password:
Enter 1 to enter passwords for the RESTful Services database users (APEX_LISTENER,APEX_REST_PUBLIC_USER), 2 to use the same password as used for APEX_PUBLIC_USER or, 3 to skip this step [1]:1
Enter the database password for APEX_LISTENER:
Confirm password:
Enter the database password for APEX_REST_PUBLIC_USER:
Confirm password:
Oct 15, 2013 1:32:38 AM oracle.dbtools.common.config.file.ConfigurationFiles update
INFO: Updated configurations: defaults, apex, apex_al, apex_rt
Enter 1 if you wish to start in standalone mode or 2 to exit [1]:2
#

Configure administrator for APEX Listener

# java -jar apex.war user adminlistener "Listener Administrator"
Oct 15, 2013 1:36:58 AM oracle.dbtools.common.config.file.ConfigurationFolder logConfigFolder
INFO: Using configuration folder: /root/apex_listener/apex
Enter a password for user adminlistener:
Confirm password for user adminlistener:
Oct 15, 2013 1:37:14 AM oracle.dbtools.standalone.ModifyUser execute
INFO: Created user: adminlistener in file: /root/apex_listener/apex/credentials

Create war for static images

# java -jar apex.war static /u01/app/oracle/apex/images
WAR Generation complete
 WAR location     : /root/apex_listener/i.war
 Context path     : /i
 Static resources : /u01/app/oracle/apex/images
Ensure the static resources are available at path: /u01/app/oracle/apex/images

Deploy on GlassFish.