Tag Archives: centos

Understanding cron environment variables

Introduction

I wanted to automate a certain task on a CentOS server, so I wrote a bash script to perform this task, with the intention of using cron to provide the scheduling.

The script worked beautifully when invoked from the SSH bash shell. However, when cron calls the script, the task failed.

Looking at the error logs, it seems like some line of commands failed with “command not found” error. This usually means that the program called in those lines are nowhere to be found in the current $PATH environment variable.

I have always assumed that when a cron job executes, it inherits the same environment variables as when you log in directly to the shell via SSH. The above error proves that this is not the case.

Finding the difference

In order to modify the script so that it will work with cron, I needed to know what the environment looks like when cron calls a script. Thankfully, a quick Google search revealed this post on stackoverflow.

First, we add the following line to the crontab. This will save the output of the env command, which is the list of all current environment variables, into a file once every minute. We just need it to run once, therefore remove the line from crontab once the first minute mark has passed.

* * * * * env > ~/env.out

The contents of this output file reveal that the environment variables loaded when cron runs a script is a very small subset of the environment variables loaded when you get to the shell prompt via SSH login.

Load the environment and test

Now we can use this output file to load the same environment variables as when cron executes a script, and modify the script we wish to run via cron until it works.

# env - `cat ~/env.out` /bin/sh
# ./script.sh

Upgrade Oracle APEX from 4.2.4 to 4.2.5

Introduction

Oracle recently released version 4.2.5 of its Application Express (APEX) software.  This post is to document how to upgrade Oracle APEX from 4.2.4 to 4.2.5.

The Oracle APEX installation to be upgraded has the following specification:

  1. The operating system of the server is CentOS 6.5.
  2. The Oracle Database version is Oracle XE 11gR2.
  3. Oracle APEX is served using the APEX Listener, via GlassFish 4.

Download and read the Patch Set Notes

First things first, read up on the patch set notes here.

Download and unzip the Patch Set

Next, the patch set is downloaded via Oracle Support.

The downloaded patch set is then extracted.

[oracle@server ~]$ unzip p17966818_425_Generic.zip

Backup database

The database is backed up as a precaution if the patch is unsuccessful.

I prefer a cold and consistent backup to ease the recovery process.

[oracle@server ~]$ rman target / nocatalog

Recovery Manager: Release 11.2.0.2.0 - Production on Fri Apr 25 09:38:09 2014

Copyright (c) 1982, 2009, Oracle and/or its affiliates.  All rights reserved.

connected to target database: XE (DBID=2709648321)
using target database control file instead of recovery catalog

RMAN> shutdown immediate

database closed
database dismounted
Oracle instance shut down

RMAN> startup mount

connected to target database (not started)
Oracle instance started
database mounted

RMAN> backup database plus archivelog;

RMAN> alter database open;

database opened
RMAN> exit

Recovery Manager complete.

Prevent access to the APEX instance

No users should be using the APEX installation while it is being upgraded.  Access to the instance should be limited.  In this particular case, since APEX is served by the APEX Listener which is hosted by a GlassFish instance, user access is prevented by shutting down the GlassFish instance.

[oracle@server ~]$ sudo service glassfish4 stop
Shutting down glassfish4: Waiting for the domain to stop ...
Command stop-domain executed successfully.
                                                           [  OK  ]

The above command is used to control the GlassFish installation only if the corresponding service init script has already been correctly created.  An example on how this is done can be found here.

Apply the patch set

Now, set the current directory to the patch directory, and apply the patch.

[oracle@server ~]$ cd patch
[oracle@server patch]$ sqlplus / as sysdba

SQL*Plus: Release 11.2.0.2.0 Production on Fri Apr 25 09:38:45 2014

Copyright (c) 1982, 2011, Oracle.  All rights reserved.

Connected to:
Oracle Database 11g Express Edition Release 11.2.0.2.0 - 64bit Production

SQL> @apxpatch.sql

The patch will now be applied, and the process will take a few minutes.

Copy patch directory contents into APEX directory

After the patch process is completed, it is time to copy the contents of the patch directory into the original APEX installation directory.

[oracle@server patch]$ cp -R * /path/to/apex/

This will include the images directory as well, and if the path to the APEX directory is the same one used to originally create the images WAR file, the WAR file need not be recreated.

Restart GlassFish

The final step is to restart the GlassFish instance.

[oracle@server ~]$ sudo service glassfish4 start
Starting glassfish4: Waiting for domain1 to start .....................................................
Successfully started the domain : domain1
domain  Location: /home/gfish/glassfish4/glassfish/domains/domain1
Log File: /home/gfish/glassfish4/glassfish/domains/domain1/logs/server.log
Admin Port: 4848
Command start-domain executed successfully.
                                                           [  OK  ]

Now the APEX installation is successfully updated to version 4.2.5, and is ready to be accessed.

Upgrade Oracle APEX from 4.2.3 to 4.2.4

Introduction

Oracle recently released version 4.2.4 of its Application Express (APEX) software.  This post is to document how to upgrade Oracle APEX from 4.2.3 to 4.2.4.

The Oracle APEX installation to be upgraded has the following specification:

  1. The operating system of the server is CentOS 6.5.
  2. The Oracle Database version is Oracle XE 11gR2.
  3. Oracle APEX is served using the APEX Listener, via GlassFish 4.

Download and read the Patch Set Notes

First things first, read up on the patch set notes here.

Download and unzip the Patch Set

Next, the patch set is downloaded via Oracle Support.

The downloaded patch set is then extracted.

[oracle@server ~]$ unzip p17607802_424_Generic.zip

Backup database

The database is backed up as a precaution if the patch is unsuccessful.

I prefer a cold and consistent backup to ease the recovery process.

[oracle@server ~]$ rman target / nocatalog

Recovery Manager: Release 11.2.0.2.0 - Production on Tue Jan 7 12:33:41 2014

Copyright (c) 1982, 2009, Oracle and/or its affiliates.  All rights reserved.

connected to target database: XE (DBID=2709648321)
using target database control file instead of recovery catalog

RMAN> shutdown immediate

database closed
database dismounted
Oracle instance shut down

RMAN> startup mount

connected to target database (not started)
Oracle instance started
database mounted

RMAN> backup database plus archivelog;

RMAN> alter database open;

database opened
RMAN> exit

Recovery Manager complete.

Prevent access to the APEX instance

No users should be using the APEX installation while it is being upgraded.  Access to the instance should be limited.  In this particular case, since APEX is served by the APEX Listener which is hosted by a GlassFish instance, user access is prevented by shutting down the GlassFish instance.

[oracle@server ~]$ sudo service glassfish4 stop
Shutting down glassfish4: Waiting for the domain to stop ...
Command stop-domain executed successfully.
                                                           [  OK  ]

The above command is used to control the GlassFish installation only if the corresponding service init script has already been correctly created.  An example on how this is done can be found here.

Apply the patch set

Now, set the current directory to the patch directory, and apply the patch.

[oracle@server ~]$ cd patch
[oracle@server patch]$ sqlplus / as sysdba

SQL*Plus: Release 11.2.0.2.0 Production on Tue Jan 7 16:07:39 2014

Copyright (c) 1982, 2011, Oracle.  All rights reserved.

Connected to:
Oracle Database 11g Express Edition Release 11.2.0.2.0 - 64bit Production

SQL> @apxpatch.sql

The patch will now be applied, and the process will take a few minutes.

Copy patch directory contents into APEX directory

After the patch process is completed, it is time to copy the contents of the patch directory into the original APEX installation directory.

[oracle@server patch]$ cp -R * /path/to/apex/

This will include the images directory as well, and if the path to the APEX directory is the same one used to originally create the images WAR file, the WAR file need not be recreated.

Restart GlassFish

The final step is to restart the GlassFish instance.

[oracle@server ~]$ sudo service glassfish4 start
Starting glassfish4: Waiting for domain1 to start .....................................................
Successfully started the domain : domain1
domain  Location: /home/gfish/glassfish4/glassfish/domains/domain1
Log File: /home/gfish/glassfish4/glassfish/domains/domain1/logs/server.log
Admin Port: 4848
Command start-domain executed successfully.
                                                           [  OK  ]

Now the APEX installation is successfully updated to version 4.2.4, and is ready to be accessed.

Set up FTP server on CentOS 6

Introduction

The purpose of this post is to document the steps to set up FTP server on CentOS 6. The FTP server software used is the default FTP server daemon for CentOS 6 at the time of writing, which is vsftpd.  The FTP server is run behind an iptables firewall and SELinux, so this post will include iptables and SELinux settings that are needed.

Install FTP server software

To start things off, the FTP server software is installed.

[hazrul@server ~]$ sudo yum grouplist | grep -i ftp
   FTP server
[hazrul@server ~]$ sudo yum groupinstall "FTP server"

Check FTP server configuration file

The vsftpd config files are located in /etc/vsftpd.  The main configuration file vsftpd.conf is edited to check the configuration, and modified where necessary.

[hazrul@server ~]$ sudo vi /etc/vsftpd/vsftpd.conf
# Example config file /etc/vsftpd/vsftpd.conf
#
# The default compiled in settings are fairly paranoid. This sample file
# loosens things up a bit, to make the ftp daemon more usable.
# Please see vsftpd.conf.5 for all compiled in defaults.
#
# READ THIS: This example file is NOT an exhaustive list of vsftpd options.
# Please read the vsftpd.conf.5 manual page to get a full idea of vsftpd's
# capabilities.
#
# Allow anonymous FTP? (Beware - allowed by default if you comment this out).
#anonymous_enable=YES
anonymous_enable=NO
#
# Uncomment this to allow local users to log in.
local_enable=YES
#
# Uncomment this to enable any form of FTP write command.
write_enable=YES
#
# Default umask for local users is 077. You may wish to change this to 022,
# if your users expect that (022 is used by most other ftpd's)
local_umask=022
#
# Uncomment this to allow the anonymous FTP user to upload files. This only
# has an effect if the above global write enable is activated. Also, you will
# obviously need to create a directory writable by the FTP user.
#anon_upload_enable=YES
#
# Uncomment this if you want the anonymous FTP user to be able to create
# new directories.
#anon_mkdir_write_enable=YES
#
# Activate directory messages - messages given to remote users when they
# go into a certain directory.
dirmessage_enable=YES
#
# The target log file can be vsftpd_log_file or xferlog_file.
# This depends on setting xferlog_std_format parameter
xferlog_enable=YES
#
# Make sure PORT transfer connections originate from port 20 (ftp-data).
connect_from_port_20=YES
#
# If you want, you can arrange for uploaded anonymous files to be owned by
# a different user. Note! Using "root" for uploaded files is not
# recommended!
#chown_uploads=YES
#chown_username=whoever
#
# The name of log file when xferlog_enable=YES and xferlog_std_format=YES
# WARNING - changing this filename affects /etc/logrotate.d/vsftpd.log
#xferlog_file=/var/log/xferlog
#
# Switches between logging into vsftpd_log_file and xferlog_file files.
# NO writes to vsftpd_log_file, YES to xferlog_file
xferlog_std_format=YES
#
# You may change the default value for timing out an idle session.
#idle_session_timeout=600
#
# You may change the default value for timing out a data connection.
#data_connection_timeout=120
#
# It is recommended that you define on your system a unique user which the
# ftp server can use as a totally isolated and unprivileged user.
#nopriv_user=ftpsecure
#
# Enable this and the server will recognise asynchronous ABOR requests. Not
# recommended for security (the code is non-trivial). Not enabling it,
# however, may confuse older FTP clients.
#async_abor_enable=YES
#
# By default the server will pretend to allow ASCII mode but in fact ignore
# the request. Turn on the below options to have the server actually do ASCII
# mangling on files when in ASCII mode.
# Beware that on some FTP servers, ASCII support allows a denial of service
# attack (DoS) via the command "SIZE /big/file" in ASCII mode. vsftpd
# predicted this attack and has always been safe, reporting the size of the
# raw file.
# ASCII mangling is a horrible feature of the protocol.
#ascii_upload_enable=YES
#ascii_download_enable=YES
#
# You may fully customise the login banner string:
#ftpd_banner=Welcome to blah FTP service.
#
# You may specify a file of disallowed anonymous e-mail addresses. Apparently
# useful for combatting certain DoS attacks.
#deny_email_enable=YES
# (default follows)
#banned_email_file=/etc/vsftpd/banned_emails
#
# You may specify an explicit list of local users to chroot() to their home
# directory. If chroot_local_user is YES, then this list becomes a list of
# users to NOT chroot().
#chroot_local_user=YES
chroot_local_user=YES
#chroot_list_enable=YES
# (default follows)
#chroot_list_file=/etc/vsftpd/chroot_list
#
# You may activate the "-R" option to the builtin ls. This is disabled by
# default to avoid remote users being able to cause excessive I/O on large
# sites. However, some broken FTP clients such as "ncftp" and "mirror" assume
# the presence of the "-R" option, so there is a strong case for enabling it.
#ls_recurse_enable=YES
#
# When "listen" directive is enabled, vsftpd runs in standalone mode and
# listens on IPv4 sockets. This directive cannot be used in conjunction
# with the listen_ipv6 directive.
listen=YES
#
# This directive enables listening on IPv6 sockets. To listen on IPv4 and IPv6
# sockets, you must run two copies of vsftpd with two configuration files.
# Make sure, that one of the listen options is commented !!
#listen_ipv6=YES

pam_service_name=vsftpd
userlist_enable=YES
userlist_DENY=NO
tcp_wrappers=YES

The default configuration provided by CentOS 6 allows the following users to log in:-

  1. Anonymous users – Read-only access to /var/ftp and its subdirectories.
  2. Local users – Read-write access to the whole filesystem, governed only by file permission.

However, if SELinux is turned on, the default SELinux configuration will stop any writes from happening.

The default vsftpd configuration is a bit loose for my liking.  I prefer not to have anonymous users logging into the server, and I prefer to have the local users confined to their home directories.  Therefore, the configuration was modified as highlighted above.

To deny anonymous users, anonymous_enable is set to NO.

To confine local users to their home directories, chroot_local_user is set to YES.

An extra line is also added to the configuration file which is userlist_deny=NO.  By default, vsftpd will check for the file /etc/vsftpd/user_list, and deny access to the users listed in that file.  By setting userlist_deny=NO, ONLY users listed in that file is allowed access.

Therefore, the initial user list file will have to be changed.

[hazrul@server ~]$ sudo cat /etc/vsftpd/user_list
# vsftpd userlist
# If userlist_deny=NO, only allow users in this file
# If userlist_deny=YES (default), never allow users in this file, and
# do not even prompt for a password.
# Note that the default vsftpd pam config also checks /etc/vsftpd/ftpusers
# for users that are denied.
root
bin
daemon
adm
lp
sync
shutdown
halt
mail
news
uucp
operator
games
nobody
[hazrul@server ~]$ sudo mv /etc/vsftpd/user_list /etc/vsftpd/user_list.bak
[hazrul@server ~]$ sudo touch /etc/vsftpd/user_list

The user list is now empty, and must be later filled with the usernames of the users that are to be allowed FTP access.

Configure SELinux to work with vsftpd

SELinux controls vsftpd on a tight leash.  To make the FTP server work as intended, at least one SELinux boolean needs to be modified.  First, all the booleans related to FTP is listed.

[hazrul@server ~]$ sudo getsebool -a | grep -i ftp
allow_ftpd_anon_write --> off
allow_ftpd_full_access --> off
allow_ftpd_use_cifs --> off
allow_ftpd_use_nfs --> off
ftp_home_dir --> off
ftpd_connect_db --> off
ftpd_use_fusefs --> off
ftpd_use_passive_mode --> off
httpd_enable_ftp_server --> off
tftp_anon_write --> off
tftp_use_cifs --> off
tftp_use_nfs --> off

In this particular setup, the boolean that needs to be changed is ftp_home_dir.  This will allow users to read and write to their home directories located in /home/username.

[hazrul@server ~]$ sudo setsebool -P ftp_home_dir on
[hazrul@server ~]$ sudo getsebool ftp_home_dir
ftp_home_dir --> on

Start and configure the vsftpd service

Next, the FTP server is started, and configured to start at boot.

[hazrul@server ~]$ sudo service vsftpd start
Starting vsftpd for vsftpd:                                [  OK  ]
[hazrul@server ~]$ sudo chkconfig vsftpd on

Configure iptables firewall to allow FTP

FTP is an interesting protocol; it requires two TCP connections: one for command, and another for data.

In active mode, the client initiates the command TCP connection on port 21 of the FTP server while providing a port number to the server for the data connection.  The FTP server then connects to the provided port from port 20 of the server.

In passive mode, similarly the client initiates the command TCP connection on port 21 of the server.  However, instead of providing a port number, the client then sends a PASV command indicating the intention to use passive mode.  The server receives the PASV command and opens up an unregistered port for the client to connect to for the data connection.  The server then sends the port number to the client for the client to initiate the connection.

A more detailed explanation of this can be found here.

To configure the iptables firewall for FTP is quite straight-forward for active mode.  Just open up incoming connections on port 21, and allow outgoing connections on port 20.

Passive mode is a bit tricky.  For the command connection, similarly port 21 is opened for incoming connections.  However, for the data connection, the port number that is needed to be opened changes from one session to another.  To open up all the unregistered port is not an acceptable solution security-wise as that is virtually one step below disabling the firewall altogether.

Fortunately, there exists an iptables module called ip_conntrack_ftp that uses the connection tracking feature of iptables to automatically open up ports for passive mode. All that is needed to be done is to load this module when iptables is started.

To recap, the following configuration needs to be performed on iptables to allow vsftpd to work properly:

  1. Open up incoming port 21.
  2. Open up outgoing port 20 (unnecessary if using the default iptables rules provided by CentOS which already opened all outgoing ports).
  3. Load the ip_conntrack_ftp module.

To open port 21, the following command is used:

[hazrul@server ~]$ sudo iptables -I INPUT 5 -m state --state NEW -p tcp --dport 21 -j ACCEPT
[hazrul@server ~]$ sudo service iptables save
iptables: Saving firewall rules to /etc/sysconfig/iptables:[  OK  ]

To load the ip_conntrack_ftp module, the iptables configuration file is modified to include the module, and the iptables service is restarted.

[hazrul@server ~]$ sudo vi /etc/sysconfig/iptables-config
# Load additional iptables modules (nat helpers)
#   Default: -none-
# Space separated list of nat helpers (e.g. 'ip_nat_ftp ip_nat_irc'), which
# are loaded after the firewall rules are applied. Options for the helpers are
# stored in /etc/modprobe.conf.
IPTABLES_MODULES="ip_conntrack_ftp"
[hazrul@server ~]$ sudo service iptables restart
iptables: Setting chains to policy ACCEPT: filter          [  OK  ]
iptables: Flushing firewall rules:                         [  OK  ]
iptables: Unloading modules:                               [  OK  ]
iptables: Applying firewall rules:                         [  OK  ]
iptables: Loading additional modules: ip_conntrack_ftp     [  OK  ]

Create a user and test FTP access

The FTP server is now properly set up and can be tested.

Begin by creating a new user.

[hazrul@server ~]$ sudo useradd ftpuser
[hazrul@server ~]$ sudo passwd ftpuser
Changing password for user ftpuser.
New password:<password>
Retype new password:<password>
passwd: all authentication tokens updated successfully.

Add the user to the vsftpd user list.

[hazrul@server ~]$ sudo bash -c "echo ftpuser >> /etc/vsftpd/user_list"

Connect to the server using an FTP client.  The connection should succeed, and transfer of files to and from the server should now work as expected.

That concludes this post on how to set up FTP server on CentOS 6.

Create init script in CentOS 6

The purpose of this post is to document how to create init script in CentOS 6 to be used with the usual service management commands such as service and chkconfig.

Introduction

After being somewhat dissatisfied with the service script provided by GlassFish, I decided to learn how to create my own service script to start, stop, and view the status of non-packaged applications.

Learn Shell Scripting

I began by looking at other service scripts that has been already provided by CentOS such as /etc/init.d/httpd and /etc/init.d/iptables for ideas.

To help understand the scripts, I had to start learning shell scripting.  A very good tutorial can be found here.

Writing the script

The skeleton script

There is a file inside CentOS that explains a bit about how to write init scripts.  The path to the file is /usr/share/doc/initscripts-*/sysvinitfiles.  You can open this file in a text editor, and have a read.

Included in this file is a base outline of an init script that we can base our script on.  The following is the content of the outline:

#!/bin/bash
#
#       /etc/rc.d/init.d/<servicename>
#
#       <description of the *service*>
#       <any general comments about this init script>
#
# <tags -- see below for tag definitions.  *Every line* from the top
#  of the file to the end of the tags section must begin with a #
#  character.  After the tags section, there should be a blank line.
#  This keeps normal comments in the rest of the file from being
#  mistaken for tags, should they happen to fit the pattern.>

# Source function library.
. /etc/init.d/functions

<define any local shell functions used by the code that follows>

start() {
        echo -n "Starting <servicename>: "
        <start daemons, perhaps with the daemon function>
        touch /var/lock/subsys/<servicename>
        return <return code of starting daemon>
}

stop() {
        echo -n "Shutting down <servicename>: "
        <stop daemons, perhaps with the killproc function>
        rm -f /var/lock/subsys/<servicename>
        return <return code of stopping daemon>
}

case "$1" in
    start)
        start
        ;;
    stop)
        stop
        ;;
    status)
        <report the status of the daemons in free-form format,
        perhaps with the status function>
        ;;
    restart)
        stop
        start
        ;;
    reload)
        <cause the service configuration to be reread, either with
        kill -HUP or by restarting the daemons, in a manner similar
        to restart above>
        ;;
    condrestart)
        <Restarts the servce if it is already running. For example:>
        [ -f /var/lock/subsys/<service> ] && restart || :
    probe)
        <optional.  If it exists, then it should determine whether
        or not the service needs to be restarted or reloaded (or
        whatever) in order to activate any changes in the configuration
        scripts.  It should print out a list of commands to give to
        $0; see the description under the probe tag below.>
        ;;
    *)
        echo "Usage: <servicename> {start|stop|status|reload|restart[|probe]"
        exit 1
        ;;
esac
exit $?

Create init script by modifying the skeleton script

Using the skeleton script as a base, and comparing it with other established init scripts, I have come up with the following for GlassFish 4:

#!/bin/bash
#
# glassfish4    GlassFish Server Open Source Edition 4.0
#
# chkconfig: 345 70 30
# description: GlassFish Server is a Java EE Application Server Platform
# processname: glassfish4

# Source function library.
. /etc/init.d/functions

RETVAL=0
prog="glassfish4"
LOCKFILE=/var/lock/subsys/$prog

# Declare variables for GlassFish Server
GLASSFISH_DIR=/home/gfish/glassfish4
GLASSFISH_USER=gfish
ASADMIN=$GLASSFISH_DIR/bin/asadmin
DOMAIN=domain1

start() {
        echo -n "Starting $prog: "
        daemon --user $GLASSFISH_USER $ASADMIN start-domain $DOMAIN
        RETVAL=$?
        [ $RETVAL -eq 0 ] && touch $LOCKFILE
        echo
        return $RETVAL
}

stop() {
        echo -n "Shutting down $prog: "
        $ASADMIN stop-domain domain1 && success || failure
        RETVAL=$?
        [ $RETVAL -eq 0 ] && rm -f $LOCKFILE
        echo
        return $RETVAL
}

status() {
        echo -n "Checking $prog status: "
        $ASADMIN list-domains | grep $DOMAIN
        RETVAL=$?
        return $RETVAL
}

case "$1" in
    start)
        start
        ;;
    stop)
        stop
        ;;
    status)
        status
        ;;
    restart)
        stop
        start
        ;;
    *)
        echo "Usage: $prog {start|stop|status|restart}"
        exit 1
        ;;
esac
exit $RETVAL

Using the script

Add the script to chkconfig

The script is placed inside the /etc/init.d/ directory, and given the name glassfish4.

Then, the script is added to the list using the chkconfig command.

[root@server ~]# chkconfig --add glassfish4
[root@server ~]# chkconfig --list glassfish4
glassfish4      0:off   1:off   2:off   3:on    4:on    5:on    6:off

Use the start operand

[root@server ~]# service glassfish4 start
Starting glassfish4: Waiting for domain1 to start .........................
Successfully started the domain : domain1
domain  Location: /home/gfish/glassfish4/glassfish/domains/domain1
Log File: /home/gfish/glassfish4/glassfish/domains/domain1/logs/server.log
Admin Port: 4848
Command start-domain executed successfully.
                                                           [  OK  ]

Use the stop operand

[root@server ~]# service glassfish4 stop
Shutting down glassfish4: Waiting for the domain to stop ......
Command stop-domain executed successfully.
                                                           [  OK  ]

Use the restart operand

[root@server ~]# service glassfish4 restart
Shutting down glassfish4: Waiting for the domain to stop ..
Command stop-domain executed successfully.
                                                           [  OK  ]
Starting glassfish4: Waiting for domain1 to start ......................
Successfully started the domain : domain1
domain  Location: /home/gfish/glassfish4/glassfish/domains/domain1
Log File: /home/gfish/glassfish4/glassfish/domains/domain1/logs/server.log
Admin Port: 4848
Command start-domain executed successfully.
                                                           [  OK  ]

Use the status operand

[root@server ~]# service glassfish4 status
Checking glassfish4 status: domain1 running

Use any other operands

[root@server ~]# service glassfish4 lalala
Usage: glassfish4 {start|stop|status|restart}

Start GlassFish 4 automatically on CentOS 6

Introduction

The purpose of this post is to document how to start GlassFish 4 automatically whenever the server it is installed in reboots.

The VPS that is hosting my Oracle APEX installation rebooted without warning the other day (as should be expected of cheap services), which required me to personally SSH into the server to restart GlassFish.

The prospect of having to manually restart GlassFish every time the server reboots does not look appealing to me.  I need to find a way to make GlassFish start automatically on boot.

Using GlassFish create-service command

Run the command

The GlassFish 4 Administration Guide Page 3-13 clearly recommends the use of the built-in command called create-service in order to automatically start GlassFish when the server boots up.

Let’s try and see it in action.

[root@server ~]# $GLASSFISH_DIR/bin/asadmin
Use "exit" to exit and "help" for online help.
asadmin> create-service
Found the Linux Service and successfully uninstalled it.
The Service was created successfully. Here are the details:
Name of the service:domain1
Type of the service:Domain
Configuration location of the service:/etc/init.d/GlassFish_domain1
User account that will run the service: root
You have created the service but you need to start it yourself.  Here are the most typical Linux commands of interest:

* /etc/init.d/GlassFish_domain1 start
* /etc/init.d/GlassFish_domain1 stop
* /etc/init.d/GlassFish_domain1 restart

For your convenience this message has also been saved to this file: $GLASSFISH_DIR/glassfish/domains/domain1/PlatformServices.log
Command create-service executed successfully.
asadmin> exit
Command multimode executed successfully.

Attempt to start GlassFish service

It seemed that the command completed successfully.  Now let’s try to start the service.

[root@server ~]# /etc/init.d/GlassFish_domain1 start
[root@server ~]# /etc/init.d/GlassFish_domain1: line 54: $GLASSFISH_DIR/glassfish/lib/nadmin: Permission denied

Something is wrong in the script somewhere.  Let’s examine the contents of the init script created by the create-service command.

[root@server ~]# vi /etc/init.d/GlassFish_domain1

Review lines 50 to 64:

ASADMIN="$GLASSFISH_DIR/glassfish/lib/nadmin"

case "$1" in
start)
    $ASADMIN start-domain    --domaindir $GLASSFISH_DIR/glassfish/domains  domain1 &
    ;;
stop)
    $ASADMIN stop-domain   --domaindir /$GLASSFISH_DIR/glassfish/domains  domain1 &
    ;;
restart)
    $ASADMIN restart-domain   --domaindir $GLASSFISH_DIR/glassfish/domains  domain1 &
    ;;
*)
    echo "usage: $0 (start|stop|restart|help)"
esac

The path to the asadmin command is wrongly set in the script.  The correct path should be $GLASSFISH_DIR/bin/asadmin.  Changing this to the correct path should rectify the error.

Modify the script

Change line 50 as follows:

ASADMIN="$GLASSFISH_DIR/bin/asadmin"

Start GlassFish service

The GlassFish server can now be started using the modified script.

[root@server ~]# service GlassFish_domain1 start
[root@server ~]# Waiting for domain1 to start .........................
Successfully started the domain : domain1
domain  Location: $GLASSFISH_DIR/glassfish/domains/domain1
Log File: $GLASSFISH_DIR/glassfish/domains/domain1/logs/server.log
Admin Port: 4848
Command start-domain executed successfully.

Restart GlassFish service

The GlassFish server can also be restarted by the script.

[root@server ~]# service GlassFish_domain1 restart
[root@server ~]# Successfully restarted the domain
Command restart-domain executed successfully.

Stop GlassFish service

Last but not least, the script can stop the GlassFish domain.

[root@server ~]# service GlassFish_domain1 stop
[root@server ~]# Waiting for the domain to stop
Command stop-domain executed successfully.

Start GlassFish 4 automatically on reboot

In addition to creating the init.d script, the asadmin create-service command also creates symbolic links inside the rc*.d folders, which makes GlassFish start automatically on runlevels 3,4 and 5.

Problems with the script

Although the script created by the asadmin create-service command is functional, I am not quite satisfied with it for the following reasons:

No chkconfig support

Other scripts in the init.d folder can be managed via the chkconfig command.  You can set which runlevels you want to run your service in using this command.  However, the script created using the asadmin create-service command is not compatible with chkconfig.

[root@server ~]# chkconfig GlassFish_domain1 --list
service GlassFish_domain1 does not support chkconfig

No status checking

Other scripts in the init.d folder use the status operand to check the running status of the service.  For instance, for the Apache web server:

[hnizam@server ~]$ sudo service httpd status
httpd (pid  13365) is running...

Unfortunately, the script provided by the asadmin create-service command does not include the definition for the status operand.

[root@server ~]# service GlassFish_domain1 status
usage: /etc/init.d/GlassFish_domain1 (start|stop|restart|help)

GlassFish runs under root user

Finally, the way the script created by the asadmin create-service command is written makes GlassFish run under the root user ID.

If you installed GlassFish under a non-root non-privileged user, and wants the GlassFish process to run under this user ID, the script will not do this for you.

Conclusion

To start GlassFish 4 automatically every time the server boots up, you can use the asadmin create-service command.  However, on Centos 6 at least, the script created by the command will not work out of the box.  Some modifications need to be done on the script before it will work as intended.

Set up WordPress on CentOS

The purpose of this post is to document the steps to set up WordPress on a server.

The server operating system is going to be CentOS which currently is my preferred server operating system.

The final objective is to have a WordPress website accessible via wordpress.hazrulnizam.com.

Perform operating system installation

First of all, the latest version of CentOS, which is 6.4, is installed on the server and the server is given the hostname server.hazrulnizam.com.  A minimal install is chosen to prevent unwanted programs to be installed, which can both be a security risk and a waste of disk space.

A non-root user is then created.

[root@server ~]# useradd hnizam
[root@server ~]# passwd hnizam
Changing password for user hnizam.
New password:<type password here>
Retype new password:<re-type password here>
passwd: all authentication tokens updated successfully.

This user is then given sudo permissions.

[root@server ~]# vi /etc/sudoers
## Next comes the main part: which users can run what software on
## which machines (the sudoers file can be shared between multiple
## systems).
## Syntax:
##
##      user    MACHINE=COMMANDS
##
## The COMMANDS section may have other options added to it.
##
## Allow root to run any commands anywhere
root    ALL=(ALL)       ALL
hnizam  ALL=(ALL)       NOPASSWD: ALL

This user is going to be used for all subsequent commands, to limit exposure on the root account.

The OS is then updated to the latest version.

[hnizam@server ~]$ sudo yum check-update

[hnizam@server ~]$ sudo yum upgrade

[hnizam@server ~]$ sudo shutdown -ry now

Check WordPress requirements

Now that the operating system is properly set up, it is time to begin the process of installing WordPress.  First, the requirements for installing WordPress should be reviewed.  At the time of writing, the current version of WordPress is 3.7.1 and according to the WordPress requirements page, the requirements for installing WordPress are:

  • PHP version 5.2.4 or greater
  • MySQL version 5.0 or greater
  • Web server capable of supporting the above (Apache or Nginx is recommended)

To enable pretty permalinks, the Apache module mod_rewrite is needed.

Apache is being chosen as the web server for this particular case as it is one of the earliest web servers and also one of the most used web server software.

Install web server (Apache)

Install the Apache software

The package group feature of the yum package manager is used to install the Apache web server software.

[hnizam@server ~]$ sudo yum grouplist | grep -i web
   Web Server
   Web Servlet Engine
   Web-Based Enterprise Management
[hnizam@server ~]$ sudo yum groupinstall "Web Server"

The Apache web server is installed as the httpd service.  The chkconfig command is used to enable the httpd service at server boot-up.

[hnizam@server ~]$ sudo chkconfig httpd --list
httpd           0:off   1:off   2:off   3:off   4:off   5:off   6:off
[hnizam@server ~]$ sudo chkconfig httpd on
[hnizam@server ~]$ sudo chkconfig httpd --list
httpd           0:off   1:off   2:on    3:on    4:on    5:on    6:off

Next, the Apache web server is started, and the ports used by the web server (port 80 for http and port 443 for https) is opened at the firewall to enable the web server to be accessed by the public.

[hnizam@server ~]$ sudo service httpd start
Starting httpd:                                            [  OK  ]
[hnizam@server ~]$ sudo iptables -L -vn
Chain INPUT (policy ACCEPT 0 packets, 0 bytes)
 pkts bytes target     prot opt in     out     source               destination
 1930  156K ACCEPT     all  --  *      *       0.0.0.0/0            0.0.0.0/0           state RELATED,ESTABLISHED
    3   236 ACCEPT     icmp --  *      *       0.0.0.0/0            0.0.0.0/0
    0     0 ACCEPT     all  --  lo     *       0.0.0.0/0            0.0.0.0/0
    1    60 ACCEPT     tcp  --  *      *       0.0.0.0/0            0.0.0.0/0           state NEW tcp dpt:22
   98 26516 REJECT     all  --  *      *       0.0.0.0/0            0.0.0.0/0           reject-with icmp-host-prohibited

Chain FORWARD (policy ACCEPT 0 packets, 0 bytes)
 pkts bytes target     prot opt in     out     source               destination
    0     0 REJECT     all  --  *      *       0.0.0.0/0            0.0.0.0/0           reject-with icmp-host-prohibited

Chain OUTPUT (policy ACCEPT 1317 packets, 168K bytes)
 pkts bytes target     prot opt in     out     source               destination
[hnizam@server ~]$ sudo iptables -I INPUT 5 -m state --state NEW -p tcp --dport 80 -j ACCEPT
[hnizam@server ~]$ sudo iptables -I INPUT 6 -m state --state NEW -p tcp --dport 443 -j ACCEPT
[hnizam@server ~]$ sudo iptables -L -vn
Chain INPUT (policy ACCEPT 0 packets, 0 bytes)
 pkts bytes target     prot opt in     out     source               destination
 2277  186K ACCEPT     all  --  *      *       0.0.0.0/0            0.0.0.0/0           state RELATED,ESTABLISHED
    3   236 ACCEPT     icmp --  *      *       0.0.0.0/0            0.0.0.0/0
    0     0 ACCEPT     all  --  lo     *       0.0.0.0/0            0.0.0.0/0
    1    60 ACCEPT     tcp  --  *      *       0.0.0.0/0            0.0.0.0/0           state NEW tcp dpt:22
    0     0 ACCEPT     tcp  --  *      *       0.0.0.0/0            0.0.0.0/0           state NEW tcp dpt:80
    0     0 ACCEPT     tcp  --  *      *       0.0.0.0/0            0.0.0.0/0           state NEW tcp dpt:443
  108 29500 REJECT     all  --  *      *       0.0.0.0/0            0.0.0.0/0           reject-with icmp-host-prohibited

Chain FORWARD (policy ACCEPT 0 packets, 0 bytes)
 pkts bytes target     prot opt in     out     source               destination
    0     0 REJECT     all  --  *      *       0.0.0.0/0            0.0.0.0/0           reject-with icmp-host-prohibited

Chain OUTPUT (policy ACCEPT 5 packets, 920 bytes)
 pkts bytes target     prot opt in     out     source               destination
[hnizam@server ~]$ sudo service iptables save
iptables: Saving firewall rules to /etc/sysconfig/iptables:[  OK  ]

Post-installation checks

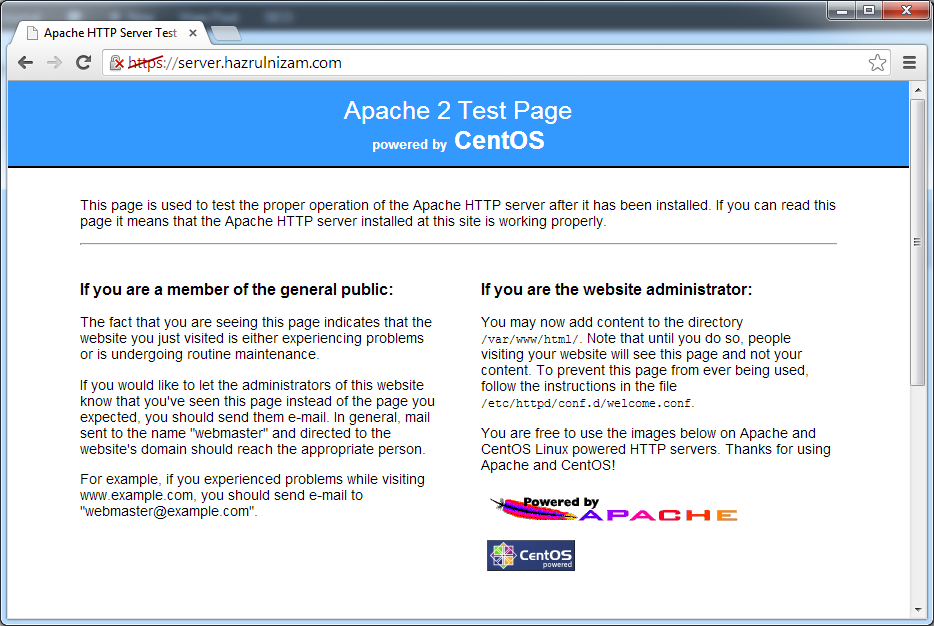
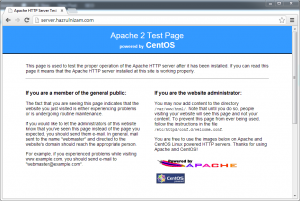
At this point, the URLs http://server.hazrulnizam.com and https://server.hazrulnizam.com should be accessible, and the default CentOS Apache welcome page is shown when these URLs are opened in a browser.

Set up WordPress - CentOS Apache http welcome page

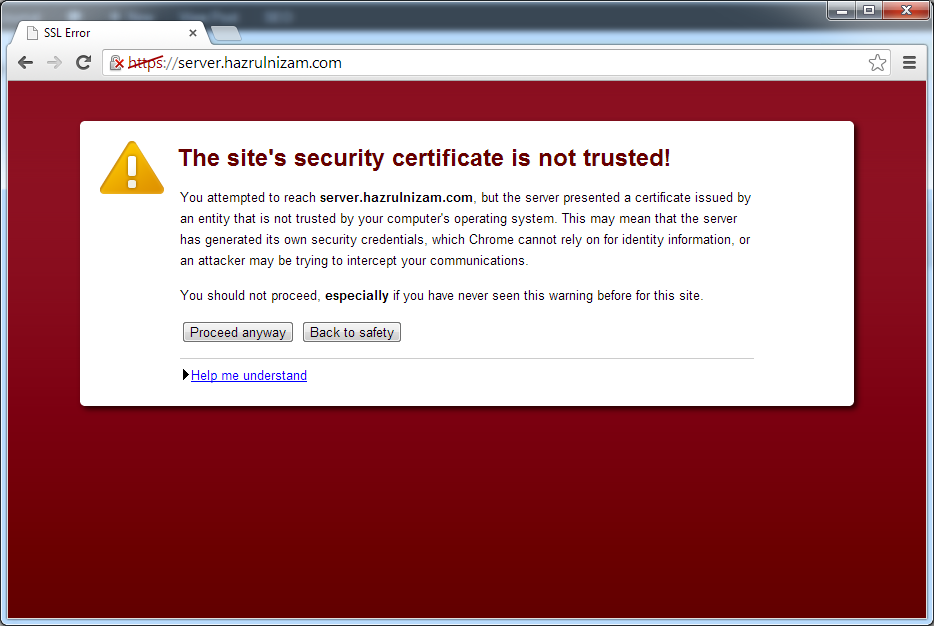
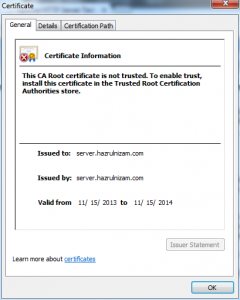
For the https page, the browser will show a certificate error, because the SSL certificate used by the default Apache installation is a self-signed certificate based on the hostname of the system.

Set up WordPress - Certificate error

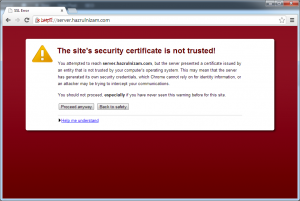
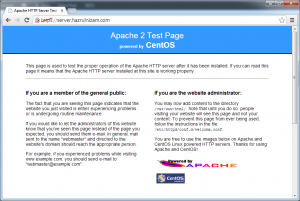
The certificate error should be ignored as it is the expected behavior.  To make SSL work without the browser showing a certificate error will require acquiring a certificate from a certificate authority like VeriSign or Comodo, which is outside the scope of this post.  A welcome page similar to the one from the http page is shown after the certificate error is ignored:

Set up WordPress - CentOS Apache https welcome page

The details of the self-signed certificate is shown when the padlock with the red cross is clicked and then ‘Certificate information’ is clicked.  Notice that the ‘Issued to:’ and ‘Issued by:’ fields are the same, which confirms that it is a self-signed certificate.

Set up WordPress - Self-signed certificate details

Install database server (MySQL)

Now that the web server has been successfully installed, it is time to install the database server.

Install the MySQL software

The method used to install MySQL is the same as the method used to install Apache, which is via yum.

[hnizam@server ~]$ sudo yum grouplist | grep -i mysql
   MySQL Database client
   MySQL Database server
[hnizam@server ~]$ sudo yum groupinstall "MySQL Database server"

The MySQL database server is installed as the mysqld service.  The chkconfig command is used to enable the mysqld service at server boot-up.

[hnizam@server ~]$ sudo chkconfig mysqld --list
mysqld          0:off   1:off   2:off   3:off   4:off   5:off   6:off
[hnizam@server ~]$ sudo chkconfig mysqld on
[hnizam@server ~]$ sudo chkconfig mysqld --list
mysqld          0:off   1:off   2:on    3:on    4:on    5:on    6:off

Next, the mysqld service is started for the first time.

[hnizam@server ~]$ sudo service mysqld start
Initializing MySQL database:  Installing MySQL system tables...
OK
Filling help tables...
OK

To start mysqld at boot time you have to copy
support-files/mysql.server to the right place for your system

PLEASE REMEMBER TO SET A PASSWORD FOR THE MySQL root USER !
To do so, start the server, then issue the following commands:

/usr/bin/mysqladmin -u root password 'new-password'
/usr/bin/mysqladmin -u root -h server.hazrulnizam.com password 'new-password'

Alternatively you can run:
/usr/bin/mysql_secure_installation

which will also give you the option of removing the test
databases and anonymous user created by default.  This is
strongly recommended for production servers.

See the manual for more instructions.

You can start the MySQL daemon with:
cd /usr ; /usr/bin/mysqld_safe &

You can test the MySQL daemon with mysql-test-run.pl
cd /usr/mysql-test ; perl mysql-test-run.pl

Please report any problems with the /usr/bin/mysqlbug script!

                                                           [  OK  ]
Starting mysqld:                                           [  OK  ]

Post-installation tasks

Now that the MySQL database server is installed and running, it is time to run the secure installation command as per advised by the MySQL first-time-start script.  The command offers to change the MySQL root password, remove anonymous user access to the MySQL database, and several other changes to help secure the database.

[hnizam@server ~]$ sudo /usr/bin/mysql_secure_installation

NOTE: RUNNING ALL PARTS OF THIS SCRIPT IS RECOMMENDED FOR ALL MySQL
      SERVERS IN PRODUCTION USE!  PLEASE READ EACH STEP CAREFULLY!

In order to log into MySQL to secure it, we'll need the current
password for the root user.  If you've just installed MySQL, and
you haven't set the root password yet, the password will be blank,
so you should just press enter here.

Enter current password for root (enter for none): <Enter>
OK, successfully used password, moving on...

Setting the root password ensures that nobody can log into the MySQL
root user without the proper authorisation.

Set root password? [Y/n] Y
New password: mysqlrootpassword
Re-enter new password: mysqlrootpassword
Password updated successfully!
Reloading privilege tables..
 ... Success!

By default, a MySQL installation has an anonymous user, allowing anyone
to log into MySQL without having to have a user account created for
them.  This is intended only for testing, and to make the installation
go a bit smoother.  You should remove them before moving into a
production environment.

Remove anonymous users? [Y/n] Y
 ... Success!

Normally, root should only be allowed to connect from 'localhost'.  This
ensures that someone cannot guess at the root password from the network.

Disallow root login remotely? [Y/n] Y
 ... Success!

By default, MySQL comes with a database named 'test' that anyone can
access.  This is also intended only for testing, and should be removed
before moving into a production environment.

Remove test database and access to it? [Y/n] Y
 - Dropping test database...
 ... Success!
 - Removing privileges on test database...
 ... Success!

Reloading the privilege tables will ensure that all changes made so far
will take effect immediately.

Reload privilege tables now? [Y/n] Y
 ... Success!

Cleaning up...

All done!  If you've completed all of the above steps, your MySQL
installation should now be secure.

Thanks for using MySQL!

Install PHP

The next step is to install the PHP interpreter.

Install the PHP interpreter software.

Same as previously, the yum package manager is used to perform the installation.

[hnizam@server ~]$ sudo yum grouplist | grep -i php
   PHP Support
[hnizam@server ~]$ sudo yum groupinstall "PHP Support"

To be able to set up WordPress properly, the PHP-MySQL extension must also be installed.

[hnizam@server ~]$ sudo yum install php-mysql

Test PHP installation

To test whether the PHP interpreter is working correctly, first the web server needs to be restarted.

[hnizam@server ~]$ sudo service httpd restart
Stopping httpd:                                            [  OK  ]
Starting httpd:                                            [  OK  ]

Next, a test file containing the phpinfo() function is created in the web server root directory.

[hnizam@server ~]$ sudo vi /var/www/html/test.php
<?php
phpinfo();
?>

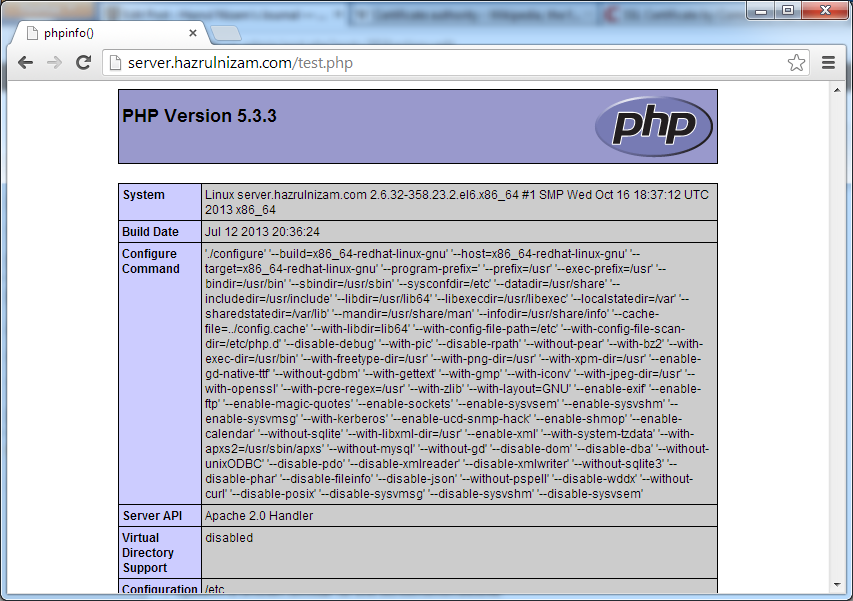
Now when the browser is set to http://server.hazrulnizam.com/test.php or https://server.hazrulnizam.com/test.php, a page with a lot of details about the system is shown similar to the screenshot below.

Set up WordPress - PHP info page

This indicates that the PHP installation is successful and that the PHP interpreter is working correctly with the web server.

The test file is then deleted.

[hnizam@server ~]$ sudo rm /var/www/html/test.php

Install and set up WordPress

With all the prerequisites now installed, it is time to install and set up WordPress itself, using the installation guide from the WordPress.org website.

Create the database and database user

A new database is created inside the installed MySQL database server to be used by WordPress and a new database user that owns the privileges to the new database is also created.

[hnizam@server ~]$ mysql -u root -p
Enter password: mysqlrootpassword
Welcome to the MySQL monitor.  Commands end with ; or \g.
Your MySQL connection id is 10
Server version: 5.1.69 Source distribution

Copyright (c) 2000, 2013, Oracle and/or its affiliates. All rights reserved.

Oracle is a registered trademark of Oracle Corporation and/or its
affiliates. Other names may be trademarks of their respective
owners.

Type 'help;' or '\h' for help. Type '\c' to clear the current input statement.

mysql> create database wordpressdb;
Query OK, 1 row affected (0.00 sec)

mysql> grant all privileges on wordpressdb.* to "wordpressdbuser"@"localhost" identified by "wordpressdbpassword";
Query OK, 0 rows affected (0.00 sec)

mysql> flush privileges;
Query OK, 0 rows affected (0.00 sec)

mysql> exit
Bye
[hnizam@server ~]$

The above commands create a database named wordpressdb and a user named wordpressdbuser whose password is wordpressdbpassword.  Any other names can be used for the database, username, and password if desired.

Download and extract the WordPress software

The latest version of the WordPress software is downloaded to the server using wget and then extracted using the tar command.

[hnizam@server ~]$ sudo yum install wget
[hnizam@server ~]$ wget http://wordpress.org/latest.tar.gz
[hnizam@server ~]$ tar -xzvf latest.tar.gz

The above commands result in an extracted folder named wordpress which contains the WordPress software.

[hnizam@server ~]$ ls -l
total 4492
-rw-rw-r--. 1 hnizam hnizam 4594818 Oct 30 04:08 latest.tar.gz
drwxr-xr-x. 5 hnizam hnizam    4096 Oct 30 04:08 wordpress

Copy extracted WordPress folder into www folder

The extracted folder is then copied into /var/www/ folder to ensure that the SELinux contexts are properly set for Apache web server.  The WordPress site will be served by Apache from this location.  Moving the folder using the mv command will preserve the SELinux contexts from the original location which is not what is desired.  Therefore, the folder is copied using the cp command.

[hnizam@server ~]$ sudo cp -R wordpress /var/www/

Next, the owner of the WordPress folder is changed to the Apache user to enable the Apache web server to read and write to that folder.

[hnizam@server ~]$ sudo chown -R apache:apache /var/www/wordpress

Set up Apache virtual host

The Apache web server needs to be configured to make it use the directory above when a browser asks for http://wordpress.hazrulnizam.com or https://wordpress.hazrulnizam.com.

First, the httpd.conf file is modified.

[hnizam@server ~]$ sudo vi /etc/httpd/conf/httpd.conf
### Section 3: Virtual Hosts
#
# VirtualHost: If you want to maintain multiple domains/hostnames on your
# machine you can setup VirtualHost containers for them. Most configurations
# use only name-based virtual hosts so the server doesn't need to worry about
# IP addresses. This is indicated by the asterisks in the directives below.
#
# Please see the documentation at
# <URL:http://httpd.apache.org/docs/2.2/vhosts/>
# for further details before you try to setup virtual hosts.
#
# You may use the command line option '-S' to verify your virtual host
# configuration.

#
# Use name-based virtual hosting.
#
#NameVirtualHost *:80
NameVirtualHost *:80
NameVirtualHost *:443
#
# NOTE: NameVirtualHost cannot be used without a port specifier
# (e.g. :80) if mod_ssl is being used, due to the nature of the
# SSL protocol.
#

#
# VirtualHost example:
# Almost any Apache directive may go into a VirtualHost container.
# The first VirtualHost section is used for requests without a known
# server name.
#
#<VirtualHost *:80>
#    ServerAdmin webmaster@dummy-host.example.com
#    DocumentRoot /www/docs/dummy-host.example.com
#    ServerName dummy-host.example.com
#    ErrorLog logs/dummy-host.example.com-error_log
#    CustomLog logs/dummy-host.example.com-access_log common
#</VirtualHost>

<VirtualHost _default_:80>
    DocumentRoot "/var/www/html"
</VirtualHost>

<VirtualHost *:80>
    DocumentRoot "/var/www/wordpress"
    ServerName wordpress.hazrulnizam.com
    <Directory "/var/www/wordpress">
        Options FollowSymLinks
        AllowOverride All
    </Directory>
    ErrorLog logs/wordpress.hazrulnizam.com-error_log
    CustomLog logs/wordpress.hazrulnizam.com-access_log combined
</VirtualHost>

Next, the SSL key and certificate for the https site are generated.

[hnizam@server ~]$ openssl genrsa -out wordpress.key -des3 2048
Generating RSA private key, 2048 bit long modulus
................................................+++
......................................................................................................................................................................+++
e is 65537 (0x10001)
Enter pass phrase for wordpress.key: passphrase
Verifying - Enter pass phrase for wordpress.key: passphrase
[hnizam@server ~]$ openssl req -new -key wordpress.key -out wordpress.csr
Enter pass phrase for wordpress.key: passphrase
You are about to be asked to enter information that will be incorporated
into your certificate request.
What you are about to enter is what is called a Distinguished Name or a DN.
There are quite a few fields but you can leave some blank
For some fields there will be a default value,
If you enter '.', the field will be left blank.
-----
Country Name (2 letter code) [XX]:MY
State or Province Name (full name) []:Kuala Lumpur
Locality Name (eg, city) [Default City]:Kuala Lumpur
Organization Name (eg, company) [Default Company Ltd]:hazrulnizam.com
Organizational Unit Name (eg, section) []:wordpress
Common Name (eg, your name or your server's hostname) []:wordpress.hazrulnizam.com
Email Address []:

Please enter the following 'extra' attributes
to be sent with your certificate request
A challenge password []:
An optional company name []:
[hnizam@server ~]$ openssl x509 -req -days 365 -in wordpress.csr -signkey wordpress.key -out wordpress.crt
Signature ok
subject=/C=MY/ST=Kuala Lumpur/L=Kuala Lumpur/O=hazrulnizam.com/OU=wordpress/CN=wordpress.hazrulnizam.com
Getting Private key
Enter pass phrase for wordpress.key: passphrase

The generated key and certificate are then copied to their proper destinations to apply correct SELinux contexts on them.  The read permissions are modified so that only the root user has access to them.

[hnizam@server ~]$ sudo cp wordpress.key /etc/pki/tls/private/
[hnizam@server ~]$ sudo chmod 600 /etc/pki//tls/private/wordpress.key
[hnizam@server ~]$ sudo cp wordpress.crt /etc/pki/tls/certs/
[hnizam@server ~]$ sudo chmod 600 /etc/pki//tls/certs/wordpress.crt
[hnizam@server ~]$ rm wordpress.crt wordpress.csr wordpress.key

Next, the virtual host configuration is added to the Apache SSL configuration file.

[hnizam@server ~]$ sudo vi /etc/httpd/conf.d/ssl.conf
<VirtualHost *:443>
    DocumentRoot "/var/www/wordpress"
    ServerName wordpress.hazrulnizam.com:443
    <Directory "var/www/wordpress">
        Options FollowSymLinks
        AllowOverride All
    </Directory>
    ErrorLog logs/wordpress.hazrulnizam.com-ssl_error_log
    CustomLog logs/wordpress.hazrulnizam.comssl_access_log combined
    LogLevel warn
    SSLEngine on
    SSLProtocol all -SSLv2
    SSLCipherSuite ALL:!ADH:!EXPORT:!SSLv2:RC4+RSA:+HIGH:+MEDIUM
    SSLCertificateFile /etc/pki/tls/certs/wordpress.crt
    SSLCertificateKeyFile /etc/pki/tls/private/wordpress.key
</VirtualHost>

The Apache web server is then restarted to load the new configurations.

[hnizam@server ~]$ sudo service httpd restart
Stopping httpd:                                            [  OK  ]
Starting httpd: Apache/2.2.15 mod_ssl/2.2.15 (Pass Phrase Dialog)
Some of your private key files are encrypted for security reasons.
In order to read them you have to provide the pass phrases.

Server wordpress.hazrulnizam.com:443 (RSA)
Enter pass phrase:passphrase

OK: Pass Phrase Dialog successful.
                                                           [  OK  ]

Notice that there is a prompt for the passphrase of the private key when Apache is starting up.  This passphrase is going to be asked every time the Apache web server is started, including during server restarts.  This can be avoided by using a private key that is not protected by a pass phrase (do not use the -des3 flag when creating the key using the openssl genrsa command).  However, care must be taken to protect the key from being accessed by anyone else.

At this point, provided that the DNS entry for wordpress.hazrulnizam.com has been correctly added, pointing a browser to http://wordpress.hazrulnizam.com will show the following page:

Set up WordPress - WordPress error page

This shows that Apache is correctly reading the WordPress files and together with the PHP interpreter is serving out dynamic PHP pages to the browser.

Enable WordPress to send emails

Before proceeding with the final step of WordPress installation, SELinux needs to be configured to allow WordPress to send emails out from the system.  There are a few events that triggers WordPress to send notification emails such as when a new comment has been posted to a post.

The setsebool command is used to change the corresponding SELinux boolean to allow Apache, and in turn WordPress, to send out emails.

[hnizam@server ~]$ sudo getsebool httpd_can_sendmail
httpd_can_sendmail --> off
[hnizam@server ~]$ sudo setsebool httpd_can_sendmail on
[hnizam@server ~]$ sudo getsebool httpd_can_sendmail
httpd_can_sendmail --> on

Install and set up WordPress via the browser

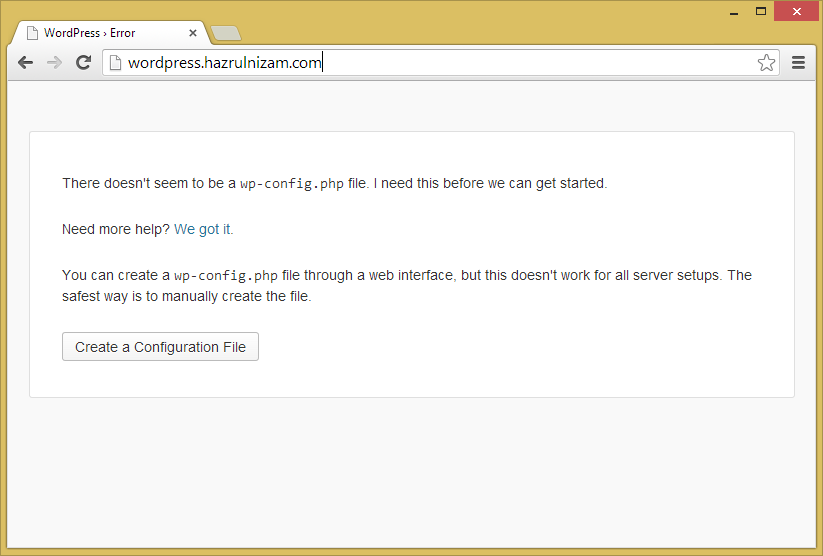
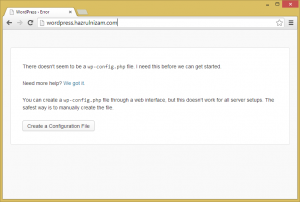
The final step of installing WordPress involves creating a WordPress configuration file.  This configuration file can either be manually created at the server, or can be created by WordPress itself via the browser.  This post will continue via the browser method as all the prerequisites to make it successful has been performed above.

The URL http://wordpress.hazrulnizam.com is entered in the browser address bar.

Set up WordPress - WordPress error page

The ‘Create a Configuration File’ button is then clicked.

Set up WordPress - Create configuration file page

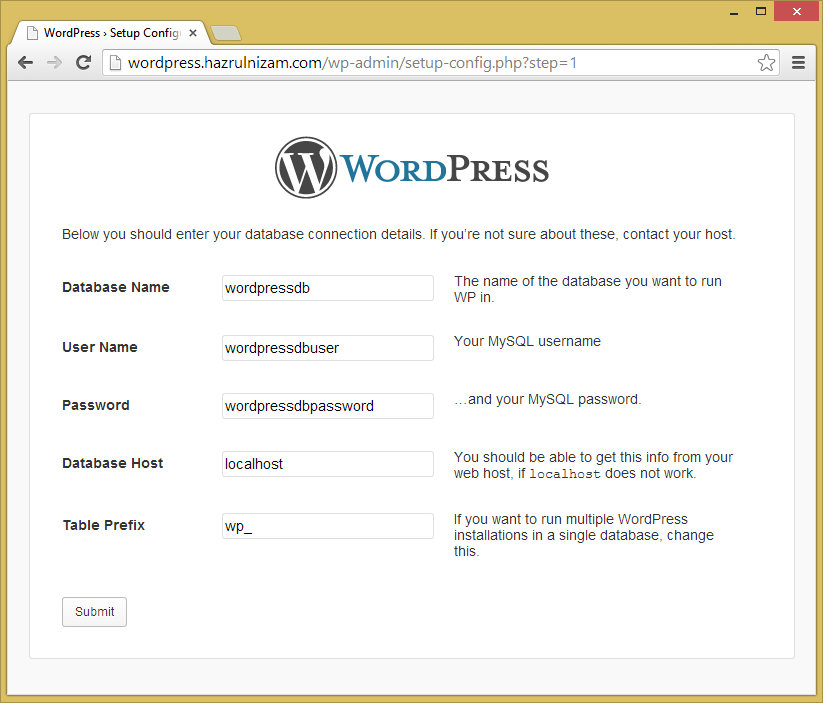
The next page shows that several information is needed to complete the installation such as database name, database username, database password, and database host.  The corresponding information are the one used in the ‘Create the database and database user’ section above.

The ‘Let’s go’ button is then clicked.

Set up WordPress - Setup Configuration page

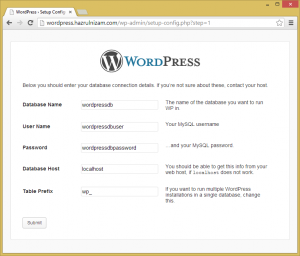
The Database Name is changed to wordpressdb, while User Name is changed to wordpressdbuser and Password is changed to wordpressdbpassword.  The Database Host and Table Prefix fields are left at the default values.

The page is then submitted.

Set up WordPress - Configuration success

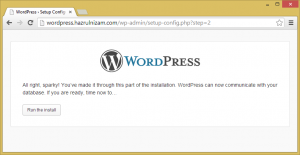
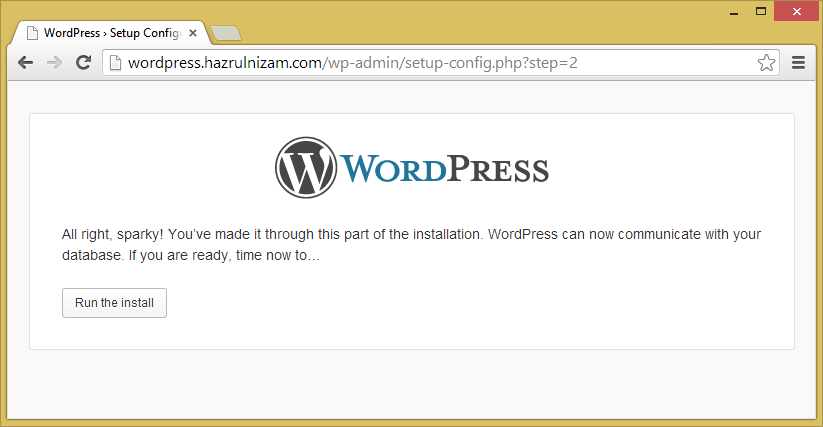
WordPress is now communicating correctly with the database.  The ‘Run the install’ button is then clicked.

Set up WordPress - Install page

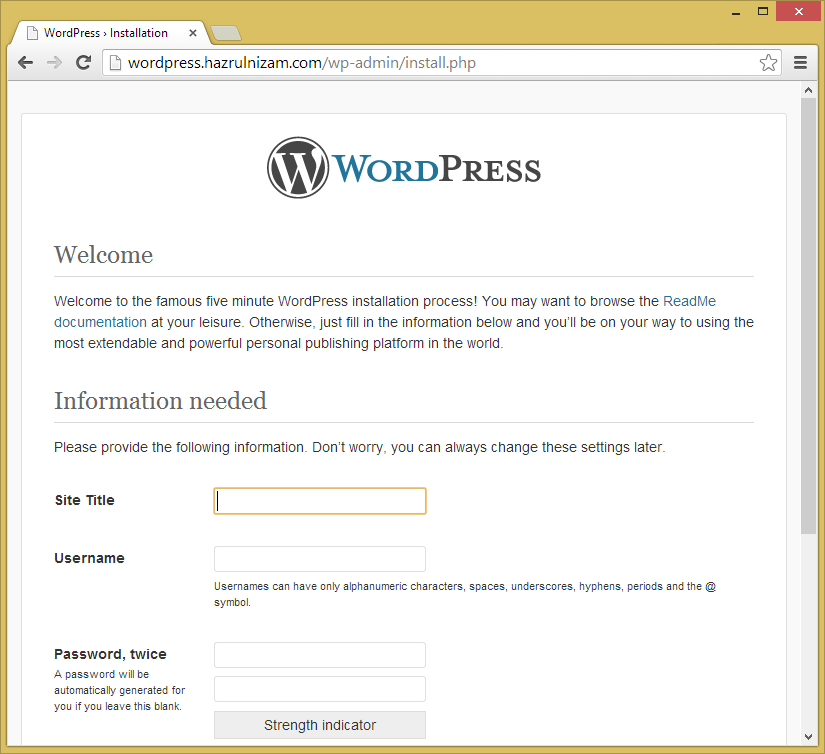
On this page, the Site Title, Username, Password and email address will have to be provided.  The Site Title will be the title shown when the WordPress site is accessed once it is installed.  The Username and Password are different than the database username and password.  This will be the username that will be used to log in to the WordPress administration pages.

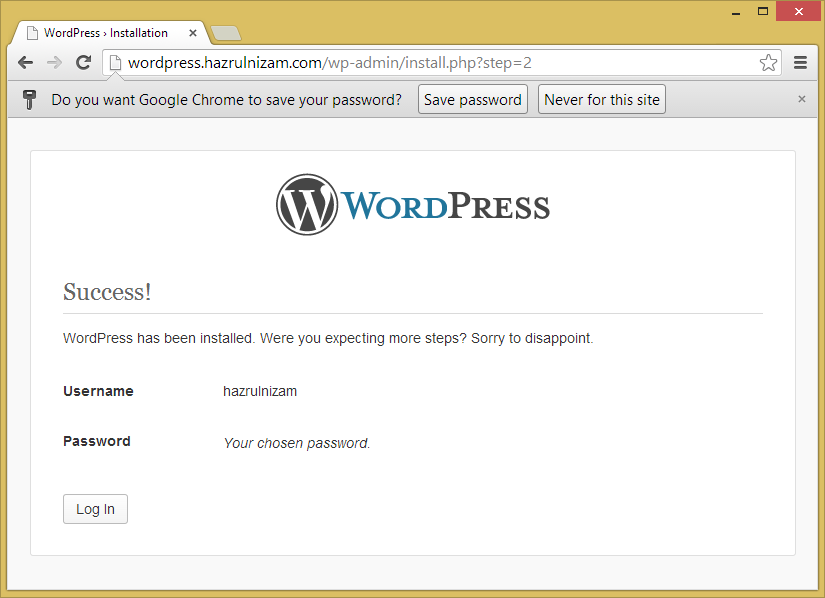
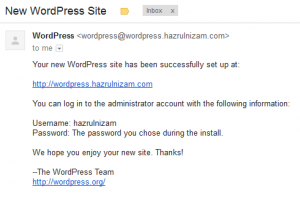
Once all the required fields are filled in and the ‘Install WordPress’ button pressed, the WordPress installation is completed and the website is now usable.

Set up WordPress - Install success page

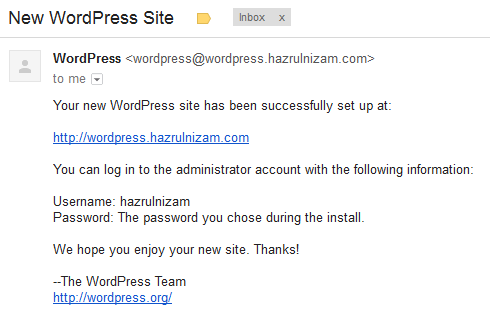
An email about the new WordPress website will also be sent to the email address specified on the install page.

Set up WordPress - New WordPress Site email

This marks the end of the WordPress install.

Optional tasks

Force SSL on login and administration

The WordPress website is now working, but when you click ‘Log in’ from the main page, it will bring you to the http version of the login page.  The username and password that you type will be sent in clear-text through the internet, making them vulnerable to anyone who would want to steal your password.

WordPress has a built-in feature to force logins and/or the administration pages to be served via https instead of http.

To enable this, edit the WordPress config file and add the following line near the end.

[hnizam@server wordpress]$ sudo vi wp-config.php
/**
 * For developers: WordPress debugging mode.
 *
 * Change this to true to enable the display of notices during development.
 * It is strongly recommended that plugin and theme developers use WP_DEBUG
 * in their development environments.
 */
define('WP_DEBUG', false);

define('FORCE_SSL_ADMIN', true);

/* That's all, stop editing! Happy blogging. */

/** Absolute path to the WordPress directory. */
if ( !defined('ABSPATH') )
        define('ABSPATH', dirname(__FILE__) . '/');

/** Sets up WordPress vars and included files. */
require_once(ABSPATH . 'wp-settings.php');

You can use FORCE_SSL_LOGIN instead of FORCE_SSL_ADMIN if you just want to protect the login page.  The administration pages will not be served via https unless you specifically asks for the https protocol via the browser.

Enable pretty permalinks

One of the first things that should be done after a WordPress install is to enable pretty permalinks.  The word-based URL will help the website to rank higher in search engine results compared to the default post ID URL.

Just go to the Settings > Permalinks via the administration pages, and choose Postname-based permalinks instead of the default.  If you followed the install steps above, pretty permalinks should work correctly.

Install plugins and themes

One of the great things about WordPress is the abundance of plugins and themes that exist in the ecosystem.  Use them to customize the website and to help in managing the website.