Tag Archives: ssl

Renewing SSL certificates

It is that time of the year when I needed to renew all of my SSL certificates for my web servers and email servers.  This post is a reminder for myself on the steps and commands needed to succesfully renew the certificates, for future reference.

First, check the current certificates and key files.  For CentOS 6, this is located at /etc/pki/tls/private and /etc/pki/tls/certs.

[root@localhost ~]# cd /etc/pki/tls/private
[root@localhost private]# ls -lart
-rw-------. 1 root root 1704 Feb 19  2014 localhost.key
-rw-r--r--. 1 root root 1033 Feb 20  2014 localhost.csr
drwxr-xr-x. 5 root root 4096 Jan 29 15:33 ..
drwxr-xr-x. 2 root root 4096 Feb 16 09:06 .
[root@localhost private]# cd ../certs
[root@localhost certs]# ls -lart
-rw-r--r--. 1 root root    1805 Feb 20  2014 localhost.crt
-rw-r--r--. 1 root root    1757 Feb 20  2014 localhost-chain.crt
-rw-r--r--. 1 root root    1521 Feb 20  2014 localhost-root.crt
-rw-r--r--. 1 root root    5083 Feb 20  2014 localhost-postfix.crt
-rw-r--r--. 1 root root 1005005 Jul 14  2014 ca-bundle.trust.crt
-rw-r--r--. 1 root root  786601 Jul 14  2014 ca-bundle.crt
-rwxr-xr-x. 1 root root     829 Jan 21 01:32 renew-dummy-cert
-rw-r--r--. 1 root root    2242 Jan 21 01:32 Makefile
-rwxr-xr-x. 1 root root     610 Jan 21 01:32 make-dummy-cert
drwxr-xr-x. 5 root root    4096 Jan 29 15:33 ..
drwxr-xr-x. 2 root root    4096 Feb 16 09:09 .

Next create the new certificate signing request (CSR).  Take this chance to create a new private key, with perhaps a higher number of bits and a better algorithm.  This is done using the -newkey, -sha256, and -keyout flags.  The -nodes flag is used to create the new private key without a passphrase (so that the services using the private key can start without needing input from a human).

[root@localhost ~]# cd /etc/pki/tls/private/
[root@localhost private]# openssl req -nodes -newkey rsa:4096 -sha256 -keyout localhost-new.key -out localhost-new.csr
Generating a 4096 bit RSA private key
................................................++
......................++
writing new private key to 'localhost-new.key'
-----
You are about to be asked to enter information that will be incorporated
into your certificate request.
What you are about to enter is what is called a Distinguished Name or a DN.
There are quite a few fields but you can leave some blank
For some fields there will be a default value,
If you enter '.', the field will be left blank.
-----
Country Name (2 letter code) [XX]:MY
State or Province Name (full name) []:Kuala Lumpur
Locality Name (eg, city) [Default City]:Kuala Lumpur
Organization Name (eg, company) [Default Company Ltd]:hazrulnizam.com
Organizational Unit Name (eg, section) []:localhost
Common Name (eg, your name or your server's hostname) []:localhost.hazrulnizam.com
Email Address []:

Please enter the following 'extra' attributes
to be sent with your certificate request
A challenge password []:
An optional company name []:
[root@localhost private]# ls -lart
-rw-------. 1 root root 1704 Feb 19  2014 localhost.key
-rw-r--r--. 1 root root 1033 Feb 20  2014 localhost.csr
drwxr-xr-x. 5 root root 4096 Jan 29 15:33 ..
-rw-r--r--. 1 root root 3272 Feb 16 10:05 localhost-new.key
-rw-r--r--. 1 root root 1748 Feb 16 10:05 localhost-new.csr
drwxr-xr-x. 2 root root 4096 Feb 16 10:05 .

Send the CSR file (localhost-new.csr) to the certificate authority, and wait for them to issue the certificate for your new key.  Put the certificate files (including the CA root and chain) in the /etc/pki/tls/certs directory.  Do not overwrite the old certificates yet!  I named them localhost-new.crt, localhost-chain-new.crt and localhost-root-new.crt

Now we need to stop all the services using the old certificates.

[root@localhost ~]# service httpd stop
Stopping httpd:                                            [  OK  ]
[root@localhost ~]# service dovecot stop
Stopping Dovecot Imap:                                     [  OK  ]
[root@localhost ~]# service postfix stop
Shutting down postfix:                                     [  OK  ]

Now rename the old certificates for backup.

[root@localhost ~]# cd /etc/pki/tls/certs
[root@localhost certs]# mv localhost.crt localhost-old.crt
[root@localhost certs]# mv localhost-chain.crt localhost-chain-old.crt
[root@localhost certs]# mv localhost-root.crt localhost-root-old.crt

[root@localhost certs]# mv localhost-postfix.crt localhost-postfix-old.crt

Then it is time to rename the new certificates to take the old certificates’ names.

[root@localhost certs]# mv localhost-new.crt localhost.crt
[root@localhost certs]# mv localhost-chain-new.crt localhost-chain.crt
[root@localhost certs]# mv localhost-root-new.crt localhost-root.crt

For postfix, all the root, chain and host certificates need to be in one file.  Create that file, taking the old file name.

[root@localhost certs]# cat localhost.crt >> localhost-postfix.crt
[root@localhost certs]# cat localhost-chain.crt >> localhost-postfix.crt
[root@localhost certs]# cat localhost-root.crt >> localhost-postfix.crt

Start all the services that was stopped.

[root@localhost ~]# service postfix start
Starting postfix:                                          [  OK  ]
[root@localhost ~]# service dovecot start
Starting Dovecot Imap:                                     [  OK  ]
[root@localhost ~]# service httpd start
Starting httpd:                                            [  OK  ]

If everything is done correctly, this should be the end of the exercise.  Test all the services and make sure everything is working as before.
OpenSSL workaround for Oracle XE wallet

In Oracle, the UTL_HTTP package is used to fetch pages from the internet directly by the database.  For example, using the UTL_HTTP.REQUEST function, the first 2000 bytes of a web page can be displayed:

SQL> SET PAGESIZE 100
SQL> select UTL_HTTP.REQUEST('http://www.google.com') from dual;

UTL_HTTP.REQUEST('HTTP://WWW.GOOGLE.COM')
--------------------------------------------------------------------------------
<!doctype html><html itemscope="" itemtype="http://schema.org/WebPage"><head><me
ta content="Search the world's information, including webpages, images, videos a
nd more. Google has many special features to help you find exactly what you're l
ooking for." name="description"><meta content="noodp" name="robots"><meta itempr
op="image" content="/images/google_favicon_128.png"><title>Google</title><script
>(function(){
window.google={kEI:"X057UtKqGYvprQeorYDgAQ",getEI:function(a){for(var b;a&&(!a.g
etAttribute||!(b=a.getAttribute("eid")));)a=a.parentNode;return b||google.kEI},h
ttps:function(){return"https:"==window.location.protocol},kEXPI:"17259,146147,40
00116,4006293,4006727,4007231,4007661,4007714,4007830,4008067,4008133,4008142,40
08365,4008725,4009033,4009378,4009565,4009663,4009671,4010061,4010806,4010899,40
10938,4011063,4011107,4011125,4011228,4011256,4011258,4011334,4011376,4011522,40
11524,4011525,4011529,4011559,4011619,4011683,4011709,4011863,4011872,4011911,40
11971,4012001,4012003,4012011,4012090,4012095,4012141,4012145,4012147,4012302,40
12306,4012316,4012318,4012342,4012361,4012365,4012422,4012544,4012585,4012593,40
12632",kCSI:{e:"17259,146147,4000116,4006293,4006727,4007231,4007661,4007714,400
7830,4008067,4008133,4008142,4008365,4008725,4009033,4009378,4009565,4009663,400
9671,4010061,4010806,4010899,4010938,4011063,4011107,4011125,4011228,4011256,401
1258,4011334,4011376,4011522,4011524,4011525,4011529,4011559,4011619,4011683,401
1709,4011863,4011872,4011911,4011971,4012001,4012003,4012011,4012090,4012095,401
2141,4012145,4012147,4012302,4012306,4012316,4012318,4012342,4012361,4012365,401
2422,4012544,4012585,4012593,4012632",ei:"X057UtKqGYvprQeorYDgAQ"},authuser:0,ml
:function(){},kHL:"en",time:function(){return(new Date).getTime()},log:function(
a,b,c,l,k){var d=new Image,f=google.lc,e=google.li,g="",h="gen_204";k&&(h=
k);d.onerror=d.onload=d.onabort=function(){delete f[e]};f[e]=d;c||-1!=b.search("
&ei=")||(g="&ei="+google.getEI(l));c=c||"/"+h+"?atyp=i&ct="+a+"&cad=

SQL>

However, for pages served with SSL i.e. the https protocol, UTL_HTTP will need access to an Oracle Wallet that stores the trusted certificates for the encryption. Attempting to connect without a wallet will result in a certificate validation error:

SQL> select UTL_HTTP.REQUEST('https://support.oracle.com') from dual;
select UTL_HTTP.REQUEST('https://support.oracle.com') from dual
       *
ERROR at line 1:
ORA-29273: HTTP request failed
ORA-06512: at "SYS.UTL_HTTP", line 1722
ORA-29024: Certificate validation failure
ORA-06512: at line 1

SQL>

An Oracle Wallet can be created by the Oracle Wallet Manager program.  Unfortunately, the Oracle Wallet Manager program is not distributed with Oracle XE.  I think this is because historically encryption has been part of Oracle Advanced Security, a paid optional Oracle feature.  The good news is SSL/TLS encryption is no longer part of Oracle Advanced Security, as per the Oracle 11gR2 Licensing Guide:

Network encryption (native network encryption and SSL/TLS) and strong authentication services (Kerberos, PKI, and RADIUS) are no longer part of Oracle Advanced Security and are available in all licensed editions of all supported releases of the Oracle database.

So far we have established that using TLS/SSL with Oracle XE is not violating any Oracle licensing issue.  We just have to find a way to create the wallet to be used by Oracle XE.  Of course you can run Oracle Wallet Manager from a non-XE Oracle installation somewhere, and transfer the wallet to your Oracle XE installation.  But what if you do not have access to any properly licensed installation of Oracle?

From the Oracle 11gR2 Advanced Security Guide:

Oracle Wallet Manager stores X.509 certificates and private keys in PKCS #12 format, and generates certificate requests according to the PKCS #10 specification. These capabilities make the Oracle wallet structure interoperable with supported third-party PKI applications and provide wallet portability across operating systems.

Therefore, we can use OpenSSL to create a PKCS #12 archive and it should work with Oracle XE.

In Oracle terminology, a wallet is a directory containing a file named ewallet.p12. Therefore, the PKCS #12 file must be named as such.

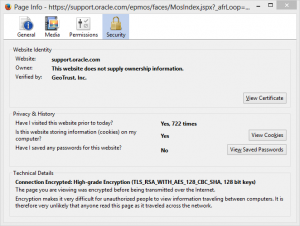
In this example I will use the Oracle Support web page as the target page.  First, grab the certificate and all the certificates in its chain by using a browser.  In Firefox, this is done by clicking the padlock icon in the address bar, then clicking on ‘More Information…’.

Firefox Page Info - Security tabThen click on ‘View Certificate’

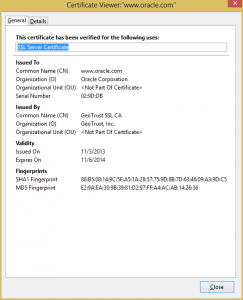
Firefox Certificate ViewerGo to the ‘Details’ tab

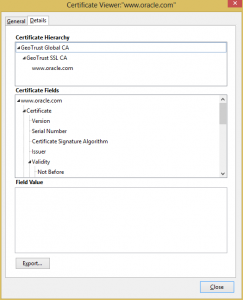
Firefox Certificate Viewer - Details tabSelect the certificate at the bottom of the chain (www.oracle.com) and click ‘Export…’.

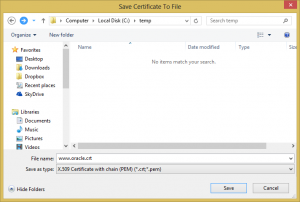
Save Certificate to FileChange the ‘Save as type’ to ‘X.509 Certificate with chain (PEM)’ and save the certificates to a file.

Transfer this file (mine is named www.oracle.crt) to your Oracle XE server where you want your wallet to be (I chose /u01/app/oracle/wallet).

Now use OpenSSL’s pkcs12 command to create the wallet file using the certificate file as input.  Use the -export flag to create a PKCS #12 file instead of reading one, and use the -nokeys flag to indicate that a private key does not exist inside the input file.  Enter a suitable password when prompted.  This password will have to be provided when using UTL_HTTP later.

[oracle@oraclexe ~]$ cd /u01/app/oracle/wallet
[oracle@oraclexe wallet]$ openssl pkcs12 -export -in www.oracle.crt -out ewallet.p12 -nokeys
Enter Export Password:
Verifying - Enter Export Password:
[oracle@oraclexe wallet]$

Now we can make SSL calls to the Oracle Support website from the database by providing the wallet and password to UTL_HTTP:

SQL> set pagesize 100
SQL> select UTL_HTTP.REQUEST('https://support.oracle.com',null,'file:/u01/app/oracle/wallet','password') Output from dual;

OUTPUT
--------------------------------------------------------------------------------
<HTML>
<HEAD>
<title>Oracle Configuration Support Manager</title>
<meta http-equiv="REFRESH" content="0;url=/epmos/faces/MosIndex.jspx"></HEAD>
<BODY>
</BODY>
</HTML>


GlassFish 4 cannot do SSL for multiple virtual hosts

I have been trying to get SSL working on GlassFish, when I realised that unlike Apache (where the SSL configuration can be defined in the virtual host block), the SSL settings for GlassFish is attached to the network listener, not the virtual host.

In the case of a default GlassFish OSE 4.0 installation, the network listener http-listener-2 is the SSL listener, and only one certificate can be associated with the listener at any one time.  The default certificate given to http-listener-2 is a self-signed certificate given the alias s1as.  Changing this to a CA-signed certificate is a matter of modifying the keystore file using the Java keytool program, and changing the certificate alias used by the network listener (via the SSL tab on the network listener configuration page).

I wanted to host multiple virtual hosts, each using a different SSL certificate as they have different domains, on GlassFish.  I wondered why one listener can only use one SSL certificate, because on Apache each virtual host block can house its own SSL settings and hosting multiple SSL sites is definitely possible (I tried).

So I began scouring the documentation and found this in the GlassFish 4.0 Security Guide:

Name-based Virtual Hosts Using name-based virtual hosts for a secure application can be problematic. This is a design limitation of the SSL protocol itself. The SSL handshake, where the client browser accepts the server certificate, must occur before the HTTP request is accessed. As a result, the request information containing the virtual host name cannot be determined prior to authentication, and it is therefore not possible to assign multiple certificates to a single IP address.

If all virtual hosts on a single IP address need to authenticate against the same certificate, the addition of multiple virtual hosts probably will not interfere with normal SSL operations on the server. Be aware, however, that most browsers will compare the server’s domain name against the domain name listed in the certificate, if any (applicable primarily to official, CA-signed certificates). If the domain names do not match, these browsers display a warning. In general, only address-based virtual hosts are commonly used with SSL in a production environment.

Okay, so it seems like GlassFish is blaming the SSL protocol for not being able to use different certificates for different virtual hosts.  The explanation makes sense though; the server will need to know from the client the name of the virtual host the client is connecting to, but this exchange will also have to be encrypted using SSL.  But which SSL certificate should the server use for this initial exchange?  The problem is understandable.

However, if the problem is the SSL protocol, shouldn’t all web servers behave the same way?  If it is impossible on GlassFish, how come it is possible on Apache?

I did some more digging, and stumbled on an Apache wiki page which stated:

As a rule, it is impossible to host more than one SSL virtual host on the same IP address and port. This is because Apache needs to know the name of the host in order to choose the correct certificate to setup the encryption layer. But the name of the host being requested is contained only in the HTTP request headers, which are part of the encrypted content. It is therefore not available until after the encryption is already negotiated. This means that the correct certificate cannot be selected, and clients will receive certificate mismatch warnings and be vulnerable to man-in-the-middle attacks.

I find it quite weird that the Apache documentation is agreeing in saying that it is impossible because I am sure it worked when I tried it.  This very blog is running on a multiple-certificate SSL server!

Then I clicked on the link on that wiki page that leads to another wiki page, which has the answer: Server Name Indication (SNI).

Apparently, SNI is an extension to the SSL protocol that was introduced in 2006 which allowed virtual hosts to use different SSL certificates and the Apache version that I use has already included SNI inside its SSL implementation.

Before SNI, one IP address and port combination can only use one SSL certificate. The introduction of SNI lifted this limitation of the SSL protocol.  So let’s get back to GlassFish.  Does it support SNI?  Based on the documentation, no.  Why doesn’t it support SNI?  Let’s find out.

Googling GlassFish SNI brought me to an interesting post by Ricardo Martín Camarero.  His encounter with SNI is the opposite of mine; he knew it was not supposed to be possible until someone told him otherwise.  He made me realise through his post that since GlassFish runs on Java, SNI support will be dependent on the Java VM.

As of the current version of Java, which is version 7, SNI implementation is only supported for clients i.e. Java clients will be able to connect to servers utilizing SNI with no certificate errors.

SNI support for servers will be added to Java 8.  As such, we might have to wait until the next version of GlassFish to use SNI.

Set up SSL on CentOS running apache

Finally got SSL running on this blog.  This post is to document the steps I took.

This wiki page was what I used as a guide.

OS is CentOS 6.4 running Apache that is packaged together with the base repository.

First, make sure the required packages are installed.

# yum install mod_ssl openssl

The installation of mod_ssl will include a default https configuration with pre-generated key and self-signed certificate.

Pre-generated key = /etc/pki/tls/private/localhost.key
Pre-generated certificate = /etc/pki/tls/certs/localhost.crt
Default config = /etc/httpd/conf.d/ssl.conf

Restarting httpd at this point will give you a working https page served with the certificate mentioned above.  Do not forget to add firewall exception for port 443.

# service httpd restart
# iptables -I INPUT <line#> -p tcp --dport 443 -j ACCEPT
# service iptables save

Browsing to this page will show a security warning on browsers because the certificate used is not issued by a trusted certificate authority.  To get rid of the security warning, we have to sign our key with a trusted certificate authority.

Now let’s move on to generating our own key and getting it signed.

Generate key using openssl (change 1024 to 2048 or higher for better encryption).

# openssl genrsa -out ca.key 1024

Now, generate a certificate signing request (CSR) for the key.

# openssl req -new -key ca.key -out ca.csr

The command will prompt for further details to be embedded in the CSR.  The output file ca.csr will then be sent to a certificate authority for them to come up with a corresponding certificate.

You can also sign your own certificate using the following command.

openssl x509 -req -days 365 -in ca.csr -signkey ca.key -out ca.crt

After you have received the certificate, either from the certificate authority or via self-signing, the CSR file is no longer needed.

Now, copy the key and the certificate to the corresponding directories (so SELinux contexts can be applied without much tinkering).

Certificates go to /etc/pki/tls/certs/while keys go to /etc/pki/tls/private/

Next we can start configuring apache to use the certificate and key.  This can be done either in the main SSL configuration file at /etc/httpd/conf.d/ssl.conf or in the VirtualHost records.

Example VirtualHost record:

<VirtualHost *:443>
        SSLEngine on
        SSLCertificateFile /etc/pki/tls/certs/ca.crt
        SSLCertificateKeyFile /etc/pki/tls/private/ca.key
        ...
        ...
        ServerName centos01.hazrulnizam.com
</VirtualHost>

Finally, restart httpd and your https page will now use the new key and certificate.  If the certificate comes from a trusted certificate authority, you will no longer get the untrusted warning.